
Buttercup Block
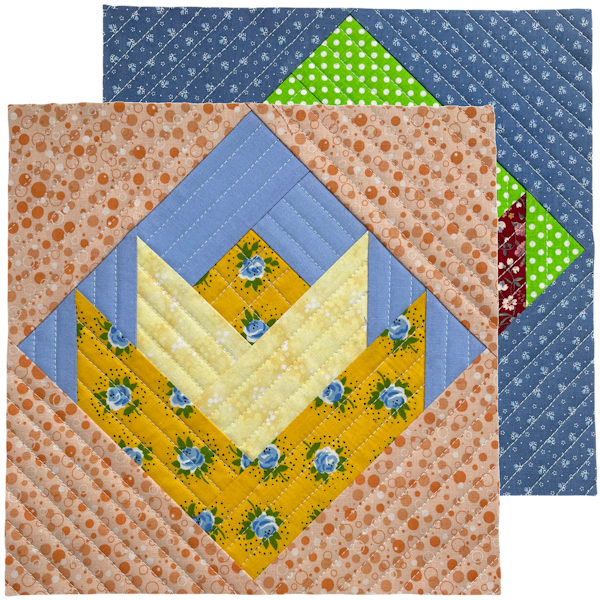
Designed by Julie A Bolduc
Using the FrankenQuilt Method formerly the Quilt as You Piece MethodThis is the 17th quilt block tutorial in a series on how to make quilt blocks using the FrankenQuilt Method formerly the Quilt as You Piece Method. This quilt block can be completely made in the Quilt as you Piece method. This one works best if you use the templates provided in the PDF file.
Materials Needed- Makes one Block:
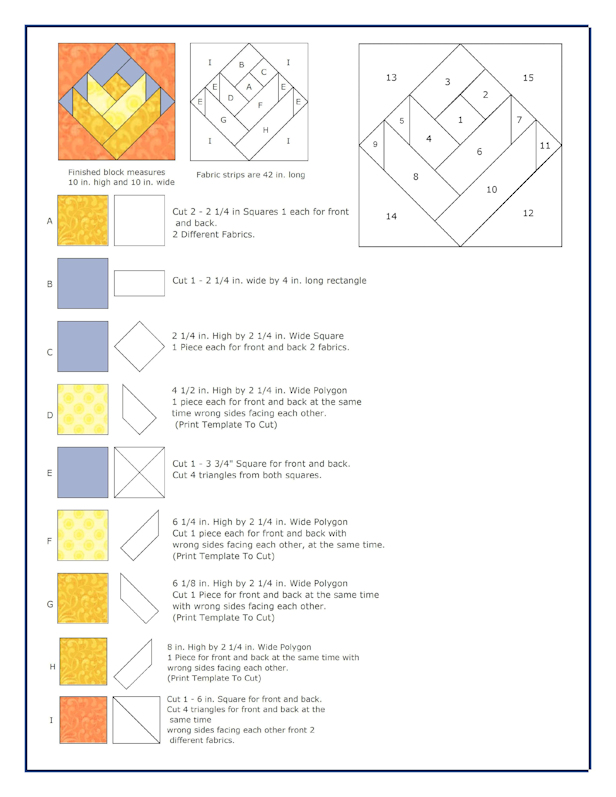
- Fabric: Follow the diagram for the sizes. Cut double the number of pieces indicated for the front and back making sure the back pieces mirror the front pieces.
- Batting Follow the diagram for the sizes making them bigger than indicated. Cut one piece of batting for each patch in the block.
- 2 sheets copy paper for the templates
- Double stick tape for the templates.
- Cotton Sewing thread in neutral color, 50wt preferred.
- Washable Liquid Glue
- Washable Glue Stick
These are the tools I used. Use what you have.
- Rotary Cutter & Cutting Mat
- Pair of Fabric Scissors
- Temporary Marking Device
- 18"x3" quilt ruler
- 10.5"x10.5" Square Ruler
- Dry Iron & Pressing Board
- Follow the sizes for cutting your pieces but make the I pieces bigger than indicated so you will have something to trim at the end.
- You can cut the batting pieces bigger if you like. They can be trimmed later.
- Add each piece as indicated in the numbered block using the FrankenQuilt Method method.
- Trim your batting as you go, after adding each piece and after quilting each piece.
- Use the Quilt as You Piece method for all pieces. Quilt as you add each piece or wait until the block is complete.
- Trim to 10-1/2" x 10-1/2". Do stay stitching, an 1/8" in from the edges, all the way around.
Block Name & Design Disclaimer: Block Name & Design Disclaimer: This block came from the quilt program, Quilt Pro 6. I did not design the block but the block is in the public domain. It is ok for me to use in this manner.
This pattern sheet just provides what materials you need and what size pieces you need to make a 10" block and in what order to sew the pieces of the block together. It does not go into complete detail how I put them together in the Quilt as You Piece manner, please refer to our tutorial of the Five Strip Rail Fence Block for the basic concept and instructions on how to do Quilt as You Piece for this block and all other blocks in this series.
Designed on December 2, 2021 by Julie A Bolduc of Just Plain fun ©2021 by Julie A Bolduc p401013
All items in our online shop ship free within the US only. I currently offer U.S. shipping only and it is from rural Maine. Delivery can vary from 2–14 days depending on your distance from Maine. Expedited shipping is not available.
Please note: I am now selling all of my paper bead making tools and other items from this web site using Paypal payments.
I have removed all of my paper bead making tools from Amazon. My Kindle crochet pattern books and paper template paperback books continue to be available on Amazon, as they are printed and fulfilled directly by Amazon. If you would like to shop my Etsy Store, follow the link in the header above.
Random Quick Tip!
Another Use for Dryer SheetsWhen making crochet, sewn or knit sachets, to put into your drawers, stuff them with used dryer sheets that have been misted with your favorite body spray or perfume. Use after shave for men's sachets.