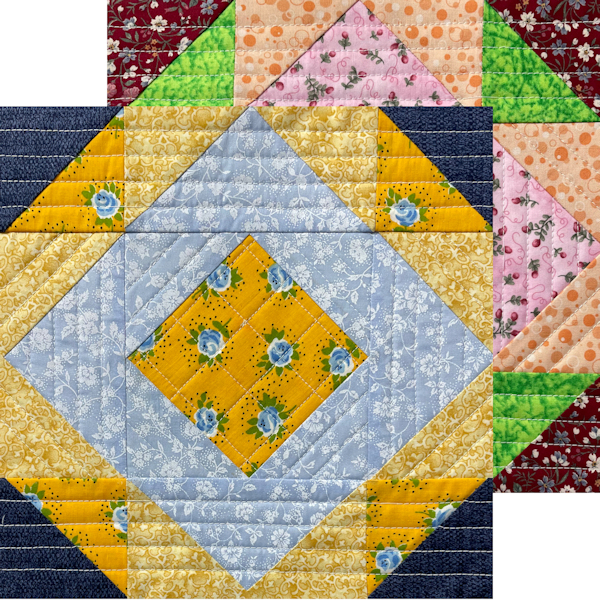
Mosaic No. 16

Using the Kouché Method formerly the Quilt as You Piece Method
This block is number 2123 in the book, "Encyclopedia of Pieced Quilt Patterns" Third Edition by Barbara Brackman, page number 239. It is also called Connecticut and Mosaic #16. This block is the 25th quilt block tutorial in a series on how to make quilt blocks using the Kouché Method formerly the Quilt as You Piece Method. This one cannot be made completely in the Kouché Method formerly the Quilt as You Piece Method. The pieces in this block are stitched together with a combination of traditional piecing and quilt as you piece. I have also included the numbers of the Accuquilt Dies I used in this block. I used the Accuquilt Qube 10" Block.
- Materials Needed Makes one Block:
- Fabric:Follow the diagram for sizes and quantities.
- Batting Follow the Diagram or Accuquilt Chart for batting sizes.
- 3/4" Batting Tape, Optional
- Cotton Sewing thread in neutral color, 50wt preferred.
- Washable Liquid Glue
- Washable Glue Stick
- Tools Needed
- Rotary Cutter & Cutting Mat
- Pair of Fabric Scissors
- Temporary Marking Device
- 18"x3" quilt ruler
- 10.5"x10.5" Square Ruler
- Dry Iron & Pressing Board
These are the tools I used. Use what you have.
Instructions
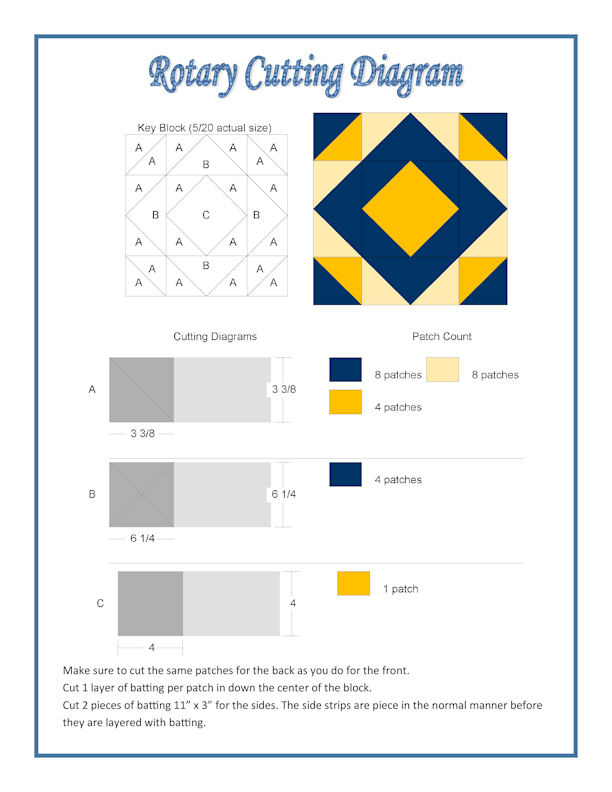
- Cutting Fabrics and Batting: Follow the "Rotary Cutting Diagram" or "Accuquilt Cutting Chart" for cutting the fabrics and batting. Remember to cut patches for both the front and back and only one piece of batting per patch in the block. Stitching Together This block is made in 3 sections, then assembled.
- Use the quilt as you piece method to stitch the center section together. You can either piece it vertically or horizontally.
- Use regular piecing techniques to sew the other 2 sections together to make 2 rectangles. Press seams in opposite directions of each other when you face them wrong side to wrong side. This will make that center seam lie flat even with the batting between them later.
- Trim to 10-1/2" x 10-1/2"
- Stay stitch, an 1/8" in from the edges, all the way around.


NOTE: I used an iron on batting tape to tape the batting to the edge of the pieces before doing the zig zag stitch to make it easier to do the zig zag stitch. It prevented the batting from shifting while I stitched it in place. This tape can also be used when you want to stitch together 2 pieces of batting for other projects where you are using batting scraps. See web site for links to the product I used. It is shown in the video as well.
Design written on March 1, 2022 by Julie A Bolduc © 2022 by Julie A Bolduc of Just Plain Fun p401020
Note: This block pattern was written with the use of the Accuquilt cutting system in mind so if you have one, and have the 10" Qube, you have all of the dies you will need for this block. Of course, if you know how the system works, you can use any size Qube to adjust your finished size of your block.
About This Block Pattern
This pattern sheet just provides what materials you need and what size pieces you need to make a 10" block and in what order to sew the pieces of the block together. It does not go into complete detail how I put them together in the Quilt as You Piece manner, please refer to our tutorial of the Five Strip Rail Fence Block for the basic concept and instructions on how to do Quilt as You Piece for this block and all other blocks in this series.
Note about Accuquilt and Just Plain Fun:
As of writing this block pattern, I am an affiliate with Accuquilt and have a referral link in the daily newsletter. I became an affiliate because their cutting system is amazing and I want everyone who quilts to experience the ease in cutting fabric for their quilts. If you click on a link and make a purchase at their website, I will get a small commission for your purchase which does not cost you anything more than what your purchase costs. I promise also to always make sure I include rotary cutting instructions and templates needed in my patterns since I know not everyone will have an Accuquilt system.
Block Name & Design Disclaimer:
Even though this block is in the "Enclyopedia of Pieced Quilt Patterns", this block is in the Public Domain. I of course did not design this block. I haven't a clue who came up with it first and I am not sure anyone does. This block is number 2123 in the book, "Encyclopedia of Pieced Quilt Patterns" Third Edition by Barbara Brackman, page number 239. It is also called Connecticut and Mosaic #16. I will make sure, any block I get from the "Enclyopedia of Pieced Quilt Patterns" will be in the public domain.
Why this block is in this series:
This block cannot be done completely in the Quilt as You Piece method but the reason for including this block in this series is to show you how I would approach making this block so it is the same on the back as on the front. I know it could have been done in the traditional Quilt as You Go method, but this method makes it easier to make sure the seam lines line up with each other.

