
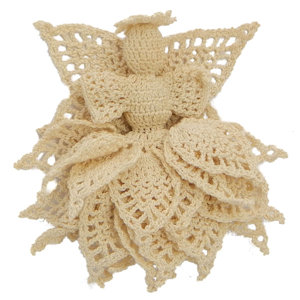
Majestic Pineapple Angel
 Designed by Julie A. Bolduc
This angel looks more difficult than it really is. It has 24 little pineapples that make up the skirt. each one is made up individually around a base round.
Materials Needed
Size 20 crochet cotton. Cebelia in Cream.
Tiny amount of polyester fiberfill
Size 11 Steel crochet hook
Thin Tapestry needle
Yarn Thickness: 20thread
Gauge: 12sc=1"
Finished Size: =5" high
Skill Level: Intermediate
How to decrease (dec)
Yo, insert hook in next st. draw up a lp, yo draw thread through 2 lps on hook, insert hook in next st, draw up al lp, yo draw thread through all 3 lps on hook.
Instructions
RND 1: Ch3, work 12 dc in 3rd ch from hook. Join w/slst to first dc. (12 sts.)
RND 2: Ch3, dc in same st as slst. Dc in next st. *2dc in next st. Dc in next st. Rep from * around. Join w/slst to top of ch3. (18 sts)
RND 3 & 4: Ch3. Dc in next st and in each st around. Join w/slst to top of ch3. (18 sts)
RND 5: Ch3. Dec 1. *Dc in next st. Dec 1. Rep from * around. Join w/slst to top of ch3. (12 sts)
RND 6: Ch1. Sc in next st. Sk next st. *Sc in next st. Sk next st. Rep from * around. (8 sts)
RND 7: Ch3. 2dc in next st. *Dc in next st. 2dc in next st. Rep from * around. Join w/slst to top of ch3. (12 sts)
RND 8: Ch3. Dc in same st as slst. 2dc in next st and in each st around. Join w/slst to top of ch3. (24 sts)
RND 9: Ch3. Dc in same st as slst. 2dc in next st and in each st around. Join w/slst to top of ch3. (48 sts)
RND 10: Ch3. Dc in each of the next 11 sts. Sk next 12 sts. Dc in each of the next 12 sts. Sk last 12 sts. Join w/slst to top of ch3. This forms the top part of the chest. You should have 24 sts around to work on.
RND 11: Ch2, dc in same st as slst. Decrease all the way around so you end up with 12 sts around. Just follow the dec instructions around. Join w/slst to first dc. Not the ch2. (12 sts)
RND 12: Ch3. Dc in each st around. Join w/slst to top of ch3. (12 sts)
RND 13: Ch3. Dc in same st as slst. 2dc in each st around. Join w/slst to top of ch3. (24 sts)
Read this next part carefully. This is where the two layers start on the skirt.RND 14A: Ch4, dc in same st as slst. Sk next st. *Dc, ch1, dc in next st. Sk next st. Rep from * around. You will now have 12 Vsts. for the top layer. Fasten off.
Work on RND 13 in the stitches that were skipped behind RND 14 A so that you are making an under skirt.
RND 14B: Tie thread on any of the skipped stitches and rep RND 14A but do not fasten off.
RND 15-18: Slst into first ch1 sp. Ch4, dc in same sp. Dc, ch1, dc in each ch1 sp around. Join w/slst to top of ch3. At the end of RND 18: Fasten off.
Work a pineapple in each ch1 sp around on RNDs 14A and 18. (There will be 12 pineapples per row.) Work each pineapple in the following way.
Small Pineapple
ROW 1: Tie thread into ch1 sp. Ch3, dc in same sp. Ch1, dc 8 times. Ch1. 2dc in sp. You now have a total of 12dc in sp with 9 ch1 sps. Ch3, turn.
ROW 2: Dc in next dc. Ch3. *Sc in next dc. Ch3. Rep from * 7 more times. Dc in next dc and in top of ch3. Ch3, turn.
ROW 3: Dc in next dc. Ch3. Sk first ch3 sp. *Sc in next ch3 sp. Ch3. Rep from * 6 more times. Sk next ch3 sp. Dc in next dc and in top of ch3. Ch3, turn.
ROW 4: Dc in next dc. Ch3. Sk first ch3 sp. *Sc in next ch3 sp. Ch3. Rep from * 5 more times. Sk next ch3 sp. Dc in next dc and in top of ch3. Ch3, turn.
ROW 5: Dc in next dc. Ch3. Sk first ch3 sp. *Sc in next ch3 sp. Ch3. Rep from * 4 more times. Sk next ch3 sp. Dc in next dc and in top of ch3. Ch3, turn.
ROW 6: Dc in next dc. Ch3. Sk first ch3 sp. *Sc in next ch3 sp. Ch3. Rep from * 3 more times. Sk next ch3 sp. Dc in next dc and in top of ch3. Ch3, turn.
ROW 7: Dc in next dc. Ch3. Sk first ch3 sp. *Sc in next ch3 sp. Ch3. Rep from * 2 more times. Sk next ch3 sp. Dc in next dc and in top of ch3. Ch3, turn.
ROW 8: Dc in next dc. Ch3. Sk first ch3 sp. *Sc in next ch3 sp. Ch3. Rep from * 1 more times. Sk next ch3 sp. Dc in next dc and in top of ch3. Ch3, turn.
ROW 9: Dc in next dc. Ch3. Sk first ch3 sp. *Sc in next ch3 sp. Ch3. Sk next ch3 sp. Dc in next dc and in top of ch3. Ch3, turn.
ROW 10: Dc in next dc. Dc in next dc and in top of ch3. Ch4, turn.
ROW 11: Slst to top of ch3 to form a lp at the tip. ch1 turn.
ROW 12: 2sc. Ch4. Slst to top of 2nd sc. 2sc in lp. Slst to top of dc in row 11 to join. Fasten off and weave ends into work.
The next step is to work the Arms.
RND 1: With the angel laying in front of you so the head is toward you, Join thread on the 12th dc in round 10. On the post of the dc. Ch4, dc in same place. Now work on the Skipped stitches of round 9. Dc, ch1, dc (vst made.) in first skipped st. *Sk next st. Vst in next st. Rep from * across the skipped stitches then work a vst in the next dcpost. Join w/slst to 3rd ch of ch4.
RND 2 & 3: Slst into first vst. Ch4, dc in same vst. Vst in each vst around. Join w/slst to 3rd ch of ch4.
RND 4: Sc in ch1 sp. Sc in each of the next 2 dc. Rep from beg 3 times more. Ch4, dc in 4th ch from hook. Ch3. Slst to same ch as dc. Sc in each st to the end of rnd. Join w/slst to first sc. Fasten off. Now flip angel over and rep with other side.
Now the Wings
Ch8. Dc in 3rd ch from hook and in each ch across. Do not Turn but go in the round. Ch3. slst in first ch of ch8. At the very beg. Ch3. Sk 1 st. Sc in next st. Ch4, Sk 2 sts. Sc in next st. Ch3. Slst to top of first dc. Ch4, sk 2 sts, sc in next st. Ch3. Sk 1 sts. Sc in next st. Fasten off. Center made. Make a small pineapple in the two ch3 sps on the sides of the center.
Large Pineapple
ROW 1: Tie thread into ch4 sp. Ch3, dc in same sp. Ch1, dc 9 times. Ch1. 2dc in sp. You now have a total of 13dc in sp with 10 ch1 sps. Ch3, turn.
ROW 2: Dc in next dc. Ch3. *Sc in next dc. Ch3. Rep from * 8 more times. Dc in next dc and in top of ch3. Ch3, turn.
ROW 3: Dc in next dc. Ch3. Sk first ch3 sp. *Sc in next ch3 sp. Ch3. Rep from * 7 more times. Sk next ch3 sp. Dc in next dc and in top of ch3. Ch3, turn.
ROW 4: Dc in next dc. Ch3. Sk first ch3 sp. *Sc in next ch3 sp. Ch3. Rep from * 6 more times. Sk next ch3 sp. Dc in next dc and in top of ch3. Ch3, turn.
ROW 5: Dc in next dc. Ch3. Sk first ch3 sp. *Sc in next ch3 sp. Ch3. Rep from * 5 more times. Sk next ch3 sp. Dc in next dc and in top of ch3. Ch3, turn.
ROW 6: Dc in next dc. Ch3. Sk first ch3 sp. *Sc in next ch3 sp. Ch3. Rep from * 4 more times. Sk next ch3 sp. Dc in next dc and in top of ch3. Ch3, turn.
ROW 7: Dc in next dc. Ch3. Sk first ch3 sp. *Sc in next ch3 sp. Ch3. Rep from * 3 more times. Sk next ch3 sp. Dc in next dc and in top of ch3. Ch3, turn.
ROW 8: Dc in next dc. Ch3. Sk first ch3 sp. *Sc in next ch3 sp. Ch3. Rep from * 2 more times. Sk next ch3 sp. Dc in next dc and in top of ch3. Ch3, turn.
ROW 9: Dc in next dc. Ch3. Sk first ch3 sp. *Sc in next ch3 sp. Ch3. Rep from * 1 more time. Sk next ch3 sp. Dc in next dc and in top of ch3. Ch3, turn.
ROW 10: Dc in next dc. Ch3. Sk first ch3 sp. *Sc in next ch3 sp. Ch3. Sk next ch3 sp. Dc in next dc and in top of ch3. Ch3, turn.
ROW 11: Dc in next dc. Dc in next dc and in top of ch3. Ch4, turn.
ROW 12: Slst to top of ch3 to form a lp at the tip. ch1 turn.
ROW 13: 2sc. Ch4. Slst to top of 2nd sc. 2sc in lp. Slst to top of dc in row 8 to join. Fasten off and weave ends into work.
Now the Halo
RND 1: Ch4, join w/slst to first ch to form ring. Ch4, *Dc in ring. Ch1. Rep from * 10 times more. You should now have 11 dc and 11 ch1 sps.
RND 2: Slst into the first ch1 sp. Ch4. *Sc in next ch1 sp. Ch3. Rep from * around. Join w/slst to first ch of ch 4.
RND 3: Slst into the first ch3 sp. *2sc. Ch4, join/slst to top of sc, 2sc in same sp. Rep from * in each ch3 sp around. Join w/slst to first sc. Fasten off and weave ends into work.
Assembly
Sew the wings to the back so the large pineapples are at the top and sew the halo to the top of the head. Arrange the petals on the skirt so they overlap all the way around.
Designed on Wednesday, September 2, 1998. Copyright © 1998 by Julie A. Bolduc p104006
JPF Crochet Club where Crocheting is Just Plain Fun This crochet pattern is for personal use only and is not to be resold.All items in our online shop ship free within the US only. I currently offer U.S. shipping only and it is from rural Maine. Delivery can vary from 2–14 days depending on your distance from Maine. Expedited shipping is not available.
Please note: I am now selling all of my paper bead making tools and other items from this web site using Paypal payments.
I have removed all of my paper bead making tools from Amazon. My Kindle crochet pattern books and paper template paperback books continue to be available on Amazon, as they are printed and fulfilled directly by Amazon. A limited number of paper bead making tools remain available on Etsy but I am not linking to those tools from this site.
Random Quick Tip!
Crocheted Christmas CandlesUse a bath tissue roll to make crocheted Christmas candles like the one in the JPF Crochet Club pattern Directory.