
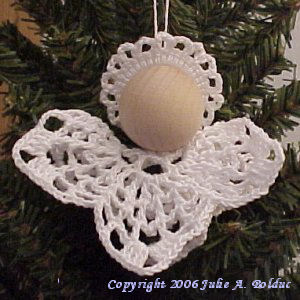
Snow Angel
 Designed By Julie A. Bolduc
This angel is made with a ruffly snowflake and is fast and easy to make. It would make a great craft fair or bazaar item.
Materials Needed
Size 10 crochet cotton in white.
Size 8 steel crochet hook
1 ¾" cabone ring.
1 1" hardwood head bead with a hole going halfway through it.
Hot Glue and gun
Tapestry Needle for weaving in ends
Yarn Thickness: 10thread
Gauge: 10sc = 1"
Finished Size: 3"diam
Skill Level: Beginner
Instructions
RND 1: Ch6, join w/slst to first ch to form ring. Ch5. *Dc in next ch. Ch2. Rep from * around. Join w/slst to 3rd ch of ch5.
RND 2: Ch7. *Dc in next dc. Ch4. Rep from * around. Join w/slst to 3rd ch of ch7.
RND 3: Ch5. (Dc, ch3, dc, ch4, dc, ch3, dc in next ch4 sp. Ch2.) *Dc in next dc. Ch2. Rep bet () once. Rep from * around. Join w/slst to 3rd ch of ch5.
RND 4: Ch4. (Dc in next dc. Ch3. Dc in next dc. Ch4. Dc in next dc. Ch3. Dc in next dc. Ch3.) *Sc in next dc. Ch3. Rep bet () once. Rep from * around. Join w/slst to first ch of ch4.
RND 5: Ch4. (Dc in next dc. Ch3. Dc in next dc. Ch4. Dc in next dc. Ch3. Dc in next dc. Ch3.) *Sc in next sc. Ch3. Rep bet () once. Rep from * around. Join w/slst to first sc.
RND 6: Ch4. (Dc in next dc. Ch3. Dc in next dc. 3dc, ch4, 3dc in next ch4 sp. Dc in next dc. Ch3. Dc in next dc. Ch3.) *Sc in next sc. Ch3. Rep bet () once. Rep from * around. Join w/slst to first sc. Fasten off and weave ends into back of work . Set aside.
RND 1 Halo: Join thread to cabone ring. Work 38 sc in ring. Join w/slst to first sc.
RND 2: *Ch4. Sk 1 sc. Sc in next sc. Rep from * around. Join w/slst to first ch of ch4. Fasten off & weave ends into back of work.
Finishing Assembly: Hot glue the first round of snowflake up into the hole in the head bead. Use a broken tipped pencil to poke the work into the head to secure it. Glue the halo to the back of head. Attach ornament hanger of choice to back of halo.
Design written on Wednesday, August 11, 2004. Copyright ©2004 By Julie A. Bolduc p104014
JPF Crochet Club where Crocheting is Just Plain Fun This crochet pattern is for personal use only and is not to be resold.All items in our online shop ship free within the US only. I currently offer U.S. shipping only and it is from rural Maine. Delivery can vary from 2–14 days depending on your distance from Maine. Expedited shipping is not available.
Please note: I am now selling all of my paper bead making tools and other items from this web site using Paypal payments.
I have removed all of my paper bead making tools from Amazon. My Kindle crochet pattern books and paper template paperback books continue to be available on Amazon, as they are printed and fulfilled directly by Amazon. A limited number of paper bead making tools remain available on Etsy but I am not linking to those tools from this site.
Random Quick Tip!
Patriotic ScrunchieTo make a scrunchie for the 4th of July, just use red white and blue yarn and your favorite quick scrunchie pattern. I have several on my site that would look great made with red white and blue varaigated yarn.