
Heavenly Angel
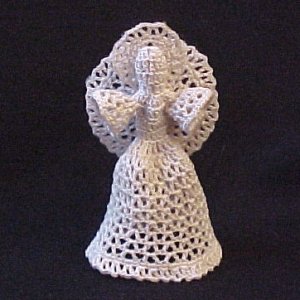 Designed By Julie A. Bolduc
This angel is made in 3 parts then glued together using hot glue. You can make it in just a few hours.
Materials Needed
Size 10 crochet cotton in ecru
Size 7 steel crochet hook
Hot Glue and gun
Tapestry Needle for weaving in ends
Polyester Fiber fill
Yarn Thickness: 10thread
Gauge: 10sc = 1"
Finished Size: 5½"" tall
Skill Level: Intermediate
Instructions
RND 1: Head: Ch3. 12dc in 3rd ch from hook. Join w/slst to top of ch3.
RND 2: Ch3. Dc in each dc around. Join w/slst to top of ch3.
RND 3: Ch3. Yo, insert hook in next st, yo, pull up a lp, yo, pull through 2 lps on hook, twice, yo, pull through all lps on hook. (dec made)*Dc in next st. Dec. Rep from * around. Join w/slst to top of ch3.
RND 4: Ch3. Dc in each st around. Join w/slst to top of ch3.
RND 5: Ch3. 2dc in same st as slst. 3dc in each st around. Join w/slst to top of ch3. (24 sts)
RND 6: Ch3. Dc in each of the next 7 dc. (Dc, ch2, dc in next dc, ch2, 3 times. Dc, ch2, dc in next dc.) Dc in each of the next 8 dc. Rep bet () once. Join w/slst to top of ch3.
RND 7: Ch1. Sc in each of the next 7 dc. Sk next dc, each of the next 7 ch2 sps, & next dc. Sc in each of the next 8 dc. Sk next dc, each of the next 7 ch2 sps & next dc. Join w/slst to ch1.
RND 8: Ch3. Dc in each sc around. Join w/slst to top of ch3.
RND 9: Ch3. Dec. *Dc in each of the next 2dc. Dec. Rep from * around. Dc in last dc. Join w/slst to top of ch3. (12 sts)
RND 10: Ch5. Dc in same st as slst. (Ch2. Dc, ch2, dc in next dc 5 times.) Ch2, dc in enxt dc, 6 times. Ch2. Join w/slst to 3rd ch of ch5. This makes the front of the skirt flatter than the back. It will make the back look like it has a bustle.
RND 11-19: Slst into the first ch 2 sp. Ch5, dc in same sp. Dc, ch2, dc in each ch2 sp around. Join w/slst to 3rd ch of ch5.
RND 20: Ch1. 2sc in next ch2 sp. Sc in next dc. *Sc in next dc. 2sc in next ch2 sp. Sc in next dc. Rep from * around. Join w/slst to top of ch1.
RND 21: Ch5. Dc in same st as slst. Sk 1st. *Dc, ch2, dc in next st. Sk 1 st. Rep from * around. Join w/slst to 3rd ch of ch5. Fasten off. Weave ends into back of work. Stuff Head
RND 1 Arms: Rejoin thread on first ch 2 sp on round 6. Ch5. Dc in same sp. Dc, ch2, dc in each of the next 6 ch2 sps. Join w/slst to 3rd ch of ch5.
RND 2: Slst into the first ch2 sp. Ch5. dc in same sp. Dc, ch2, dc in each ch2 sp around. Join w/slst to 3rd ch of ch5.
RND 3: Ch1. 2sc in enxt ch2 sp. Sc in next dc. *Sc in next dc. 2sc in next ch2 sp. Sc in next dc. Rep from * around. Join w/slst to ch1. Fasten off. Repeat with other side.
RND 1Wings: Ch1 12. Join w/slst to first ch to form ring. Ch5. *Dc in ring. Ch2. Rep from * 12 times more. Join w/slst to 3rd ch of ch5. (14 ch2 sps)
ROW 1 First side: Slst into the first ch 2 sp. Ch5, dc in same sp. Dc, ch2, dc in each of the next 6 ch2 sps. Ch1, turn.
ROW 2 & 3: Slst into the first ch2 sp. Ch5, dc in same sp. Dc, ch2, dc in each of the next 6 ch2 sps. Ch1, turn.
ROW 4: 2sc in first ch2 sp. *Sc in each of the next 2 dc. *2sc in next ch2 sp. Sc in each of the next 2 dc. Rep from * 4 times more. 3sc in last ch2 sp. Ch5, turn.
ROW 5: Dc in first sc. *Sk 1 st. Dc, ch2, dc in next sc. Rep from * 12 times more. Dc, ch2, dc in last sc. Fasten off.
ROW 1-4 2nd side: Rejoin thread in next unworked ch2 sp on round 1. Rep rows 1-4.
ROW 5: Ch5, dc in same sp. Dc, ch2, dc in next sc. *Sk 1 sc. Dc, ch2, dc in next sc. Rep from * 12 times more. Fasten off. Weave ends into back of work.
Halo
RND 1 : Ch4. Join w/slst to first ch to form ring. Ch5. *Dc in ring. Ch2. Rep from * 6 times more. Join w/slst to 3rd ch of ch5.
RND 2: Ch1. 2sc in next ch2 sp. *Sc in next dc. 2sc in next ch2 sp. Rep from * around. Join w/slst to ch1.
RND 3: Ch5, dc in same st as slst. Sk 1 st. *Dc,c h2, dc in next st. Sk 1 st. Rep from * around. Join w/slst to 3rd ch of ch5. Fasten off. Weave all ends into back of work.
Finishing Stiffening: Stiffen all parts with fabric stiffener and allow to dry completely. Shape as needed while they are drying.
Finishing Assembly: Using hot glue, glue wings to back and halo to back of head.
Design written on Friday, July 9, 2004. Copyright ©2004 By Julie A. Bolduc p104018
JPF Crochet Club where Crocheting is Just Plain Fun http://www.jpfun.com This pattern is for personal use only and not to be resold.All items in our online shop ship free within the US only. I currently offer U.S. shipping only and it is from rural Maine. Delivery can vary from 2–14 days depending on your distance from Maine. Expedited shipping is not available.
Please note: I am now selling all of my paper bead making tools and other items from this web site using Paypal payments.
I have removed all of my paper bead making tools from Amazon. My Kindle crochet pattern books and paper template paperback books continue to be available on Amazon, as they are printed and fulfilled directly by Amazon. If you would like to shop my Etsy Store, follow the link in the header above.
Random Quick Tip!
Inexspensive Gift BoxesSave those cereal and cracker boxes and use them as gift boxes. Just flatten them and once in a while, decorate one for Christmas or birthdays. Apply Gesso or white primer, or craft paint and decorate to your heart's content. Let your imagination go wild. When you are done decorating, and ready to use for a gift, use double stick tape to fasten the bottom of the box and put your gift inside, loosely wrapped with tissue paper. Then seal the other side with more double stick tape and either wrap as other gifts or just put a name tag on the festive gift box as it is.