
Basic Granny Square
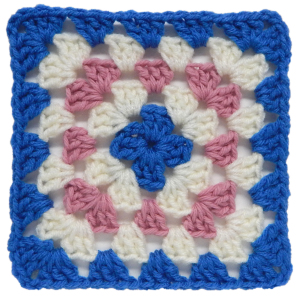
Written by Julie A. Bolduc
The pattern for this square is not my original design but it is the version I have been using for many years. So I thought that I would share this with you. This is the perfect basic granny square pattern to learn how to make granny squares and other motifs with.
Materials Needed:
Small amount worsted weight 4ply yarn, any color.
Size G aluminum crochet hook
Yarn Needle for Weaving in ends
Yarn Thickness: 4mm
Gauge: 4dc=1"
Finished Size: 6" x 6"
Skill Level: Beginner
Instructions
RND 1:Ch 4, join with sl st to first ch to form ring. Ch3, 2 dc in rg. Ch 2, *3dc in rg, ch3. Repeat from * 2 times more. Ch2, slst in top of ch3.
RND 2: Sl st in the first 2 dc's and in the first ch 2 lp. Ch3, 2 dc in ch 2 sp, ch2, work 3 dc in same sp. Work the following 3 times (Ch1, work 3 dc, ch2, 3 dc in next ch 2 lp.) Ch1, join with slst to top of ch 3.
RND 3: Sl st in the first 2 dc's and in the first ch 2 sp. Ch 3, 2 dc in ch 2 sp, ch 2, work 3 dc in same sp. Ch 1, work 3 dc in next ch 1 sp. Ch 1. Work the following 3 times (Work 3 dc, ch2, 3 dc in next ch 2 sp. Ch 1, work 3 dc in next ch 1 sp. Ch 1.) Join with sl st to top of ch 3.
Work the next rounds exactly the same but work the following into each ch1 sp on each side of square. (Ch 1, 3 dc, ch 1). You can make your granny square as big as you want by adding RNDs. Or you can stop at 6 RNDs to make an afgan out of individual squares. You can also use a different color yarn for each RND of a square for a dazzling effect.
Changing Colors
To change colors at beginning of each rnd Fasten off after slst to top of ch3. Leave yarn about 5" long and after square is complete, weave ends into work. Tie on new color in ch 2 lp and proceed onto the next rnd in pattern.
For Finishing each square, After sl st into the top of ch 3, fasten off and either weave both ends into work or weave just the starting end into the work and leave the finishing end long to sew the squares together. It depends on what type of effect you want as to what you should do.
All items in our online shop ship free within the US only. I currently offer U.S. shipping only and it is from rural Maine. Delivery can vary from 2–14 days depending on your distance from Maine. Expedited shipping is not available.
Please note: I am now selling all of my paper bead making tools and other items from this web site using Paypal payments.
I have removed all of my paper bead making tools from Amazon. My Kindle crochet pattern books and paper template paperback books continue to be available on Amazon, as they are printed and fulfilled directly by Amazon. If you would like to shop my Etsy Store, follow the link in the header above.
Random Quick Tip!
Another Use for Dryer SheetsWhen making crochet, sewn or knit sachets, to put into your drawers, stuff them with used dryer sheets that have been misted with your favorite body spray or perfume. Use after shave for men's sachets.