
Clusters Basket
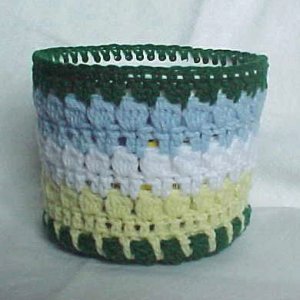 Designed By Julie A. Bolduc
This basket, made from scraps, can be used as an Easter decoration by putting Easter grass and eggs in it or it can be a plant pot cover or a storage container for your desk. I am using it on my desk to hold markers, 6" rulers, my paper punches, scissors and other stuff I like to have close at hand.
Materials Needed
Small amounts each of 4 colors. Kelly green, light yellow, light blue and white.
Worsted weight acrylic yarn
Size H/8 aluminum crochet hook
Large whipped topping container 16 oz size
Hole punch ¼" size
Yarn needle for weaving in ends
Yarn Thickness: 4mm
Gauge: 4sc=1"
Finished Size: 5"hx6"diam
Skill Level: Intermediate
Instructions
Prepare plastic container. Punch 48 holes evenly spaced around the rim of the plastic container. Set aside and let your hands rest a bit. They may get sore.
RND 1: With green. Ch5, join w/slst to first ch to form ring. Ch4. *Dc in ring. Ch1. Rep from * 10 times more. Join w/slst to 3rd ch of ch4.
RND 2: Ch3, dc in same st as slst. Ch1. *2dc in next dc. Ch1. Rep from * around. Join w/slst to top of ch3.
RND 3: Ch4. *Dc in next dc. Ch1. Rep from * around. Join w/slst to 3rd ch of ch4.
RND 4: Ch3. Yo, insert hook in next st. Yo, pull through 2 lps on hook, yo pull through all lps on hook. Ch2. *Yo, insert hook in next st, yo, pull through 2 lps on hook, yo, insert hook in next dc, yo, pull through 2 lps on hook, yo, pull through all lps on hook. Ch2. Rep from * around. Join w/slst to top of ch3. Fasten off Green.
RND 5: Join yellow to sp bet cluster stitches on round3 behind work. Ch3. Dc in same st in front of work. *Dc in next sp between cluster stitches behind work. Dc in same st in front of work. Rep from * around. Join w/slst to top of ch3.
RND 6: Ch3. Dc in each dc around. Join w/slst to top of ch3.
RND 7: Ch3, yo, insert hook in same st as slst. Yo, pull through 2lps on hook, yo pull through all lps on hook. Ch2. Sk next st. *Yo, insert hook in same st, yo, pull through 2 lpso n hook, yo, insert hook in same st, yo, pull through 2 lps on hook, yo, pull through all lps on hook. Ch2. Rep from * around. Join w/slst to top of ch 3. Fasten off yellow.
RND 8: Join white to same st as slst. Ch3. Dc in next ch1 sp. *Dc in next cluster. Dc in next ch1 sp. Rep from 8 around. Join w/slst to top of ch3.RND 9: Rep rnd 7. Fasten off white.
RND 10: Join blue and repeat rnd 8.
RND 11: Rep rnd 7. Fasten off blue.
RND 12: Join green and rep rnd 8. At this point, do not cut yarn but weave all ends into back of work leaving the last end intact.
RND 13: Join to prepared plastic container working 1 sc in each st and each hole in container around. Join w/slst to first sc. Fasten off and weave ends into work.
Design written on Friday, April 02, 2004. Copyright ©2004 By Julie A. Bolduc p116003
All items in our online shop ship free within the US only. I currently offer U.S. shipping only and it is from rural Maine. Delivery can vary from 2–14 days depending on your distance from Maine. Expedited shipping is not available.
Please note: I am now selling all of my paper bead making tools and other items from this web site using Paypal payments.
I have removed all of my paper bead making tools from Amazon. My Kindle crochet pattern books and paper template paperback books continue to be available on Amazon, as they are printed and fulfilled directly by Amazon. If you would like to shop my Etsy Store, follow the link in the header above.