
Pumpkin Drawstring Bag
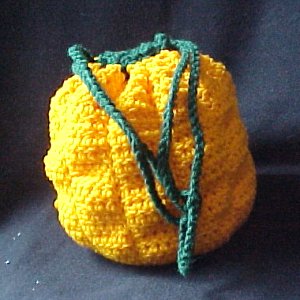 Designed By Julie A. Bolduc
This pumpkin bag is the perfect Trick Or Treat bag for your little one. Or you can use it during the Fall holidays to store those plastic store bags. That is what is inside the example in the picture.
Materials Needed
Worsted weight acrylic yarn in orange
Worsted weight acrylic yarn in green
Old CD
Size H/8 aluminum crochet hook
Yarn needle for weaving in ends
Yarn Thickness: 4mm
Gauge: 4dc = 1"
Finished Size: 6"x7"
Skill Level: Beginner
Instructions
RND 1 Inside: Ch4. Join w/slst to first ch to form ring. Ch3. 15dc in ring. Join w/slst to top of ch3. (16dc)
RND 2: Ch3. Dc in same st as slst. 2dc in each st around. Join w/slst to top of ch3. (32dc)
RND 3: Ch3. Dc in same st as slst. 1dc in next st. *2dc in next st. 1dc in next st. Rep from * around. Join w/slst to top of ch3. (48dc)
RND 4: Ch3. Dc in same st as slst. Dc in each of the next 2 dc. *2dc in next st. Dc in each of the next 2 dc. Rep from * around. Join w/slst to top of ch3. (64dc)Fasten off weave ends into back of work.
RND 1 - 4 Outside: Rep rnds 1 -4 of inside circle. Do not fasten off at the end of round 4.
RND 5: Put the inside and the outside circles together wrong sides facing each other. Ch1. Work 1 sc in each st around working through both layers. In 3 of the stitches, evenly spaced, work 2 sc instead of 1. Also insert CD between the circles before closing. Join w/slst to first sc.(67sc.)
RND 6: Ch3. Dc in each of the next 4 sts. Sc in next st. *Dc in each of the next 5 sts. Sc in next st. Rep from * around. Join w/slst to top of ch3.
RND 7-22: Ch3. Dc in each of the next 4 dc. Sc in next sc. *Dc in each of the next 5 dc. Sc in next sc. Rep from * around. Join w/slst to top of ch3. At the end of round 22. Fasten off and weave all ends into back of work.
RND 23: Join green to same st as slst. Ch3. Dc in next dc. Ch1. Sk next dc. Dc in each of the next 2 dc. Ch1. Sk next sc. *Dc in each of the next 2 dc. Ch1. Sk next dc. Dc in each of the next 2 dc. Ch1. Sk next sc. Rep from * around. Join w/slst to top of ch3. Fasten off and weave ends into back of work.
Finishing Ties: Make 2 with green. Ch 80. Fasten off. Weave both of them through round 23 in opposite directions to form a drawstring. Tie ends together and trim close.
Design written on Thursday, July 8, 2004. Copyright ©2004-2007 By Julie A. Bolduc p116010
All items in our online shop ship free within the US only. I currently offer U.S. shipping only and it is from rural Maine. Delivery can vary from 2–14 days depending on your distance from Maine. Expedited shipping is not available.
Please note: I am now selling all of my paper bead making tools and other items from this web site using Paypal payments.
I have removed all of my paper bead making tools from Amazon. My Kindle crochet pattern books and paper template paperback books continue to be available on Amazon, as they are printed and fulfilled directly by Amazon. If you would like to shop my Etsy Store, follow the link in the header above.
Random Quick Tip!
Filling Easter BasketsEvery Year my kids use the same Easter Baskets. They set them out on the Dining Table and the Easter Bunny fills them up in the middle of the night with all sorts of Easter Goodies. It's was a tradition that we had been doing since my kids were really little. They really looked forward to finding out what can fit into it.