
Bead Loom Bracelet
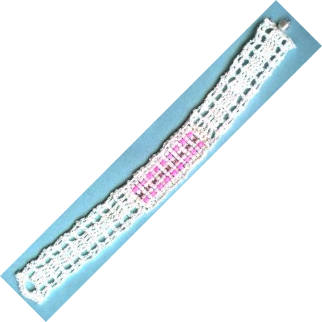
Designed By Julie A. Bolduc
This bracelet is made using two techniques. Bead weaving on a loom and crochet. You could use any combination of colors you would like as long as you make it 7 beads wide by 19 rows long.

Materials Needed
Seed beads in 3 colors.
Pearl, pink and pink rocaille were used.
White sewing thread
White Size 20 Cebelia Crochet Cotton
Size 11 steel Crochet Hook
Beading Loom
Beading Needle
1 Pearl Bead 6 to 8 mm
Tapestry Needle
Thread Thickness: 20thread
Gauge: 12dc=1"
Finished Size: 1" x 8"
Skill Level: Intermediate
NOTE: You need a beading loom to make this project. You can get one in any good craft store or craft department of any major department store. Just follow the basic instructions on how to use it.
If you know how to use a loom, then just set up your loom with 8 warp threads and follow the chart for beading.
After you are done beading, take the beading off of the loom and tie the end threads together so you have 4 sets of two threads on each end. Leave them about 2" long for now. You will cut them off after you are done crocheting. This will lock in your beads.
Start Crocheting
Starting at the top left corner of the narrow end. Join thread to outside warp thread. Sc in this first sp, ch2 then sc on the side warp in the first sp after the first bead. Work a row of sc, ch1, on the perimeter of the beading on the warp threads between the beads.
When you get to the ends of the beading, work between the beads. This is a little tricky but it can be done. At each corner, work sc, ch2, sc around the corner bead. When you get back to where you started, join w/slst to first sc. Ch3, turn.
Now you will work the strap one side at a time.
ROW 1: Dc in next sc. Ch1, work 4dc evenly spaced across the end. Ch1. Then work 2dc in ch2 corner sp. Ch3, turn.
ROW 2-12: Dc in next dc. Ch1. Dc in each of the next 4 dc. Ch1. Dc in next dc. Dc in top of ch3. Ch3, turn. At the end of row 12, ch1, turn.
ROW 13: Sc in each of the first 2 sts. Ch3. Sc in next dc and in top of ch3. Ch1, turn.
ROW 14: Sc in each of the first 2 sts. 5sc in ch3 sp. Sc in next 2 sc. Fasten off and weave ends into work. Other end.
Join thread to Ch2 sp on right side of other end of beading.ROW 1-12: Repeat as for other side.
ROW 13: Sc in each of the first 2 sts. Ch2. Dc in each of the next 4 dc. Ch2. Sc in last 2 sts. Fasten off and weave ends into work. Sew pearl bead with pink rocaille on to this last row to form a button.
Trim the threads and put tiny dots of glue on the knots you made earlier to secure them
To wear this bracelet, use button to secure.Design written on Wednesday, May 26, 1999. Copyright © 1999 By Julie A. Bolduc f107006
All items in our online shop ship free within the US only. I currently offer U.S. shipping only and it is from rural Maine. Delivery can vary from 2–14 days depending on your distance from Maine. Expedited shipping is not available.
Please note: I am now selling all of my paper bead making tools and other items from this web site using Paypal payments.
I have removed all of my paper bead making tools from Amazon. My Kindle crochet pattern books and paper template paperback books continue to be available on Amazon, as they are printed and fulfilled directly by Amazon. If you would like to shop my Etsy Store, follow the link in the header above.
Random Quick Tip!
Row MarkersGee what would make good stitch markers without buying the commercial ones? I use tabs from loaves of bread. They have sharp little nibs on them but they can easily be filed down with an emery board. Or you can always use the old standby, scraps of contrasting yarn. I know, I know, you may have already heard this tip but I feel it deserves to be heard again.