
Patchwork Stocking Ornament
 Designed by Julie A. Bolduc
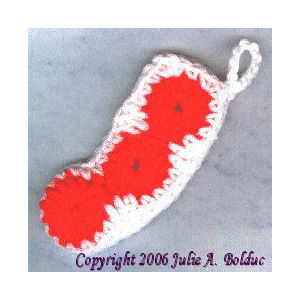
This Patchwork Stocking Ornament is made with six small circles which are sewn together in a stretched "L" shape. It is open at top so that little goodies can be tucked inside for some lucky person.
Materials Needed:
Small amount red and white worsted weight yarn
Size G hook
yarn needle
Thread Thickness: 4mm
Gauge: 1 circle=1 ½"
Finished Size: =5 ½" from tip of hanger to toe. 2" wide at cuff.
Skill Level: Intermediate
Motif: Make Six. With red.
Ch 3, work 13 dc in 3rd ch from hook. Join with sl st to first dc. Yes the dc. This will hide the ch 3.
Fasten off and weave startting ends into back of circle but leave the finishing ends intact for sewing the circles together.
Using red yarn and a yarn needle, sew three circles together using 3 stitches on each circle to make a stretched out letter "L" with the finishing ends that were left unwoven. Sew the other 3 motifs together the opposite way so when you put them together to make a stocking, you will have the wrong sides facing each other when you are ready to sew them together.
Starting at the top, right side facing you, attach white yarn on the left side as close to top as possible to make a square corner.
Ch 2, sc in same st as where you attached the yarn. Sc in each of the next 4 sts, (dc in the next st where you made a sewn st, at the seam and in the next sewn stitch on the circle). Sc around the toe of the stocking to the heal of the stocking and repeat bet (). Sc in the next4 sts then repeat bet () again. Sc in the next 4 sts, ch 1, sc in same st as last sc then sc in the next 2 sts. Sl st in first sc to join. Fasten off. Do this to both sides.
Finishing
With wrong sides together, with white yarn, sew the two pieces together, using overcast st all the way around but leave the top of the stocking open and make a hanger on the back of the stocking. To make hanger, tie yarn on top of the heal side and ch 15, sl st to 15th ch from hook. Sc to the other side of back of the stocking ch 1, fasten off. Weave ends into work.
Design written in February 1998 Copyright ©1998 by Julie A. Bolduc p103001
All items in our online shop ship free within the US only. I currently offer U.S. shipping only and it is from rural Maine. Delivery can vary from 2–14 days depending on your distance from Maine. Expedited shipping is not available.
Please note: I am now selling all of my paper bead making tools and other items from this web site using Paypal payments.
I have removed all of my paper bead making tools from Amazon. My Kindle crochet pattern books and paper template paperback books continue to be available on Amazon, as they are printed and fulfilled directly by Amazon. If you would like to shop my Etsy Store, follow the link in the header above.
Random Quick Tip!
Can CozyNow that it is summer and you are probably drinking more beverages that come in a can, you might want to make some can covers to absorb the condesation out side the can. Well the pattern for the JPFCup would work great for this! You can get the pattern at
//www.jpfun.com/patterns/14misc/jpfcup.shtml. But if this does not work for you, you can make a simple dc circle then when it gets to 2-1/2" in diameter, just continue working one dc in each stitch around joining at the end of each round until it is the right height for the can. I would think using Variegated cotton yarn would work best for these covers.