
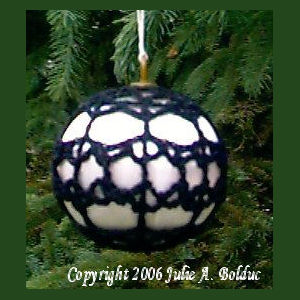
Lacet Ball Ornament
Designed by Julie A. BolducThis ornament is made with a different color combination but you could use any color thread you want. When I made this ornament, I had envisioned a bunch of these hung around a reception hall of a wedding with silver and white decorations all around. This would be a good color combination to use to coordinate with the Man's traditional Black Tuxedo.
Materials Needed:
Grandma's Best Crochet Cotton size 10. Black
2½" diameter Satin covered white Christmas ornament.
Size 8 Steel Crochet Hook Boye was used.
Tapestry Needle
Thread Thickness: 10thread
Gauge: 10sc=1"
Finished Size: 2½" diameter
Skill Level Beginner
Instructions
RND 1: Ch10, join w/slst to first ch to form ring. Ch10. Dc in ring. *Ch7. Dc in ring. Rep from * 5 times more. Ch3, join with a tr in 3rd ch of ch10.
RND 2: Ch6. *Sc in next ch7 sp. Ch6. Rep from * around. Join w/slst to first ch of ch6.
RND 3: Ch6, sc in next ch6 sp. Ch3. *Dc in next sc. Ch3. Sc in next ch6 sp. Ch3. Rep from * around. Join w/slst to 3rd ch of ch6.
RND 4: Ch12, Dc in next dc. Ch9. *Dc in next dc. Ch9. Rep from * around. Join w/slst to 3rd ch of ch12.
RND 5: Ch6, Sk next 2 chs. Sc in next ch. Ch3. Sk next ch. Dc in next ch. Ch3. Sk next ch. Sc in next ch. Ch3. Sk next 2 chs. *Dc in next dc. Sk next 2 chs. Sc in next ch. Ch3. Sk next ch. Dc in next ch. Ch3. Sk next ch. Sc in next ch. Ch3. Sk next 2 chs. Rep from * around. Join w/slst to 3rd ch of ch6.
RND 6: Ch9. Dc in next dc. Ch6. *Dc in next dc. Ch6. Rep from * around. Join w/slst to 3rd ch of ch 9.
RND 7: Ch6. Sc in next ch6 sp. Ch3. Dc in next dc. Ch3. Sc in next ch6 sp. Ch3. *Dc in next dc. Ch3. Sc in next ch6 sp. Ch3. Dc in next dc. Ch3. Sc in next ch6 sp. Ch3. Rep from * around. Join w/slst to 3rd ch of ch6.
RND 8: Ch9. *Sk next dc, dc in next dc. Ch6. Rep from * around. But half way through, slip ornament into the work making sure the starting ring is around the hanger. Join w/slst to 3rd ch of ch9. Now work the rest of the rounds with the ornament inside the work.
RND 9: Ch6. Sc in next ch6 sp. Ch3. Dc in next dc. Ch3, sc in next ch6 sp. Ch3. *Dc in next dc. Sc in next ch6 sp. Ch3. Dc in next dc. Ch3, sc in next ch6 sp. Ch3. Rep from * around. Join w/slst to 3rd ch of ch6.
RND 10: *Ch6. Sc in next dc. Rep from * 6 times more. Ch3, join w/dc to 3rd ch of ch6.
RND 11: Ch3. Dc in each ch6 sp around. Join w/slst to top of ch3. Fasten off and weave ends into work.
Design written on Wednesday, June 09, 1999. Copyright ©1999 by Julie A. Bolduc p103013
All items in our online shop ship free within the US only. I currently offer U.S. shipping only and it is from rural Maine. Delivery can vary from 2–14 days depending on your distance from Maine. Expedited shipping is not available.
Please note: I am now selling all of my paper bead making tools and other items from this web site using Paypal payments.
I have removed all of my paper bead making tools from Amazon. My Kindle crochet pattern books and paper template paperback books continue to be available on Amazon, as they are printed and fulfilled directly by Amazon. A limited number of paper bead making tools remain available on Etsy but I am not linking to those tools from this site.
Random Quick Tip!
Coffee Filter AngelsYou can make a very cute angel ornament for any occasion such as weddings, Easter, Christmas etc... by using 3 coffee filters. Actually if you use a cotton ball torn in half for the head then you only need to use 2 coffee filters. 1. Scrunch up one coffee filter to make a small ball.2. Place the ball inside the center of the 2nd coffee filter and form a neck just under the ball by pinching the coffee filter around it. Then wrap a piece of plain transparent tape around the neck. Flair out the skirt. 3. Fold the 3rd coffee filter in half then accordion fold it in the center to form the wings. Then glue the wings to the back.