
Freedom Ball Ornament
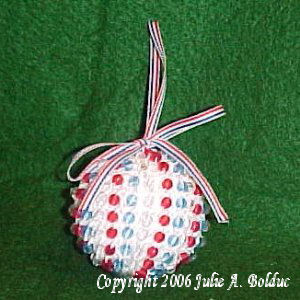 Designed By Julie A. Bolduc
This ornament is made with beads in every single round. I used red, clear and blue beads in it but you can use what ever color you choose.
Materials Needed
Size 10 crochet cotton in White. Southmaid was used in the example
64 4mm red faceted clear beads
64 4mm blue faceted clear beads
64 4mm clear faceted beads
Small amount polyester fiberfill
Size 7 steel crochet hook
Fine Tapestry Needle for weaving in ends and finishing.
18" 1/8" w red, white and Blue gros grain ribbon
Yarn Thickness: 10thread
Gauge: 10sc = 1"
Finished Size: 2" diam
Skill Level: Beginner
Instructions
RND 1: String on all beads onto the crochet thread in the following order. Red, clear, blue, red clear, blue. Over and over again. Ch4. Join w/slst to first ch to form ring. Ch3. Beaded Dc. *Dc in ring. Start a dc in the next stitch but before you pull the thread through the last 2 lps on hook, bring up a bead then pull the thread through the last 2 lps on hook securing the bead in the stitch. Beaded Dc made.(Bdc). Rep from * 4 times more. Join w/slst to top of ch3. 12 sts around. 6 of them beaded.
RND 2: Ch3. Bdc in same st as slst. Dc, bdc in each st around. Join w/slst to top of ch3.
RND 3: Ch3. Bdc in same st as slst. Dc in next st. *Bdc, dc in next st. Bdc in next st. Dc, bdc in next st. Dc in next st. Rep from * around. Join w/slst to top of ch3.
RND 4: Ch3. Bdc in same st as slst. Dc in next st. Bdc in next st. *Dc, bdc in next st. Dc in next st. Bdc in next st. Rep from * around. Join w/slst to top of ch3.
RND 5-7: Ch3. Bdc in next st. *Dc in next st. Bdc in next st. Rep from * around. Join w/slst to top of ch3.
RND 8: Ch3. Bdc in next st. Yo, insert hook in next st, yo, pull up a lp, yo, pull through 2 lps on hook, insert hook in next st, pull up a lp, yo, pull through 2 lps on hook, yo, pull through last 2 lps on hook. Dec made. Bdc in next st. Dc in next st. Work another dec but before pulling through the last 2 lps on hook, pull up a bead and then pull through the last 2 lps on hook to secure the bead in the stitch. Bdec made. *Dc in next st. Bdc in next st. Dec 1. Bdc in next st. Dc in next st. Bdec 1. Rep from * around. Join w/slst to top of ch3.
RND 9: Ch3. Bdec 1. *Dc in next st. Bdec 1. Rep from * around. Join w/slst to top of ch3. At this point, stuff ornament with polyester fiberfill.
RND 10: Ch1. Bdec 1. *Dec 1. Before finishing the last dec, join to top of ch3. Fasten off, weave finishing end into the last round to gather up tight to close. Weave other end into work. Weave both ends of the ribbon down through the center of the top of the ornament and tie a knot at the top of the ornament to secure it. Then tie the ends into a bow.
Design written on Thursday, April 29, 2004. Copyright ©2004 By Julie A. Bolduc p103028
All items in our online shop ship free within the US only. I currently offer U.S. shipping only and it is from rural Maine. Delivery can vary from 2–14 days depending on your distance from Maine. Expedited shipping is not available.
Please note: I am now selling all of my paper bead making tools and other items from this web site using Paypal payments.
I have removed all of my paper bead making tools from Amazon. My Kindle crochet pattern books and paper template paperback books continue to be available on Amazon, as they are printed and fulfilled directly by Amazon. A limited number of paper bead making tools remain available on Etsy but I am not linking to those tools from this site.
Random Quick Tip!
Magnetic Pin BowlGet yourself a magnetic parts bowl from your local hardware store and use it to catch and hold pins while sewing or doing other crafts that require the use of pins. You can also use it for corralling other small metal objects to keep your work surface tidy.