
Burnt Mtn. Pillowghan Square
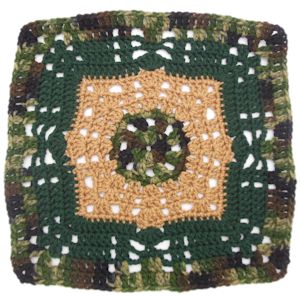
Designed by Julie A Bolduc
This pillowghan Square is named after a mountain my area. It is fun to make and would be pretty done in any combination of colors.
Materials Needed
Worsted weight acrylic yarn in Red Heart Super Saver Camouflage ART. E302B
Worsted weight acrylic yarn in Red Heart Super Saver Dark Sage ART. E300
Worsted weight acrylic yarn in Red Heart Super Saver Warm Brown Color 0336
Size H/8 or 5mm aluminum crochet hook
Yarn needle for weaving in ends
Yarn Thickness: 3mm
Gauge: 4sc = 1"
Finished Size: 12" x 12"
Skill Level: Beginner to Intermediate
RND 1: With Camouflage, Ch4, join w/slst to first ch to form ring. Ch3. 15 dc in ring. Join w/slst to top of ch3.
RND 2: Ch3, dc in same st as slst. Ch2. Sk 1 st. *2dc in next dc, ch2, sk 1 dc. Rep from * around. Join w/slst to top of ch3.
RND 3: Ch1. Sc in next dc. 3sc in next ch2 sp. *Sc in each of the next 2 dc. 3sc in next ch2 sp. Rep from * around. Join w/slst to ch1. Fasten off camouflage.
RND 4: Join warm brown to same st as slst. Ch3, dc in next sc. Ch1, sk next sc. 3dc in next sc. Sk next sc. *Dc in each of the next 2 sc. Ch1. Sk 1 sc. 3dc in next sc. Ch1 sk 1 sc. Rep from * around. Join w/slst to of ch3.
RND 5: Ch3. Dc in next dc.(3dc, ch2, 3dc in next ch1 sp. Sk next dc. Dc in each of the next 2 dc. Ch1. Sk next dc. 3dc in next dc. Ch1. Sk next dc.) *Dc in each of the next 2 dc. Rep bet () once. Rep from * around. Join w/slst to top of ch3.
RND 6: Ch3. Dc in next dc. Ch1. (3dc, ch2, 3dc in next ch2 sp. Ch1. Sk 1 dc. Dc in each of the next 2 dc. Ch1. Sk next dc. 5dc in next dc. Ch1. Sk next dc.) *Dc in each of the next 2 dc. Ch1. Rep bet () once. Rep from * around. Join w/slst to top of ch3.
RND 7: Ch1. Sc in next dc. (Sc in next ch1 sp. Sc in each of the next 3 dc. 2sc, ch2, 2sc in next ch2 corner sp. Sc in each of the next 3 dc. Sc in next ch 1 sp. Sc in each of the next 2 dc. Sc in next ch1 sp. Ch2. Sk 2 dc. Sc in next dc. Ch2. Sk 2 dc. Sc in next ch1 sp.) *Sc in next dc. Rep bet () once. Rep from * around. Join w/slst to ch1. Fasten off warm brown.
RND 8: Join Dark Sage to same st as slst. Ch3. Dc in each of the next 7 sc. (2dc, ch1, 2dc in next ch2 corner sp. Dc in each of the next 9 sc. 5dc in next sc. Dc in next sc.) *Dc in each of the next 8 sc. Rep bet () once. Rep from * around. Join w/slst to top of ch3.
RND 9: Ch3. Dc in next dc. (Ch1. Sk next st. Dc in each of the next 5 dc. Ch1. Sk 2 dc. 2dc, ch2, 2dc in next ch1 corner sp. Ch1. Sk 2 dc. Dc in each of the next 5 sts. Ch1. Sk next st. Dc in each of the next 2 dc. Ch3. Sk 3 sts. Sc in next st. Ch3. Sk 3 sts.) *Dc in each of the next 2dc. Rep bet () once. Rep from * around. Join w/slst to top of ch3.
RND 10: Ch3. Dc in next dc. Ch1. (Dc in each of the next 5 dc. Dc in next ch1 sp. Ch1. 2dc, ch2, 2dc in next ch2 corner sp. Ch1. Dc in next ch1 sp. Dc in each of the next 5 dc. Ch1. Dc in each of the next 2 dc. Ch3. Sc in next ch3 sp. Sc in next sc. Sc in next ch3 sp. Ch3.) *Dc in each of the next 2 dc. Ch1. Rep bet () once. Rep from * around. Join w/slst to top of ch3. Fasten off Dark Sage.
RND 11: Join camouflage to same st as slst. Ch3. Dc in next dc. Ch1. (Dc in each of the next 6 dc. Dc in next ch1 sp. 2dc, ch2, 2dc in next ch2 corner sp. Ch1. Dc in next ch1 sp. Dc in each of the next 6 dc. Ch1. Dc in each of the next 2 dc. Ch2. Dc in each of the next 3 sc. Ch2.) *Dc in each of the next 2 dc. Ch1. Rep bet () once. Rep from * around. Join w/slst to top of ch3.
RND 12: Ch3. Dc in next dc. (Dc in next ch1 sp. Dc in each of the next 7 dc. Dc in next ch1 sp. Dc in each of the next 2 dc. 2dc, ch2, 2dc in next ch2 corner sp. Dc in each of the next 2dc. Dc in next ch1 sp. Dc in each of the next 7 dc. Dc in next ch1 sp. Dc in each of the next 2dc. 2dc in next ch2 sp. Dc in each of the next 4 dc. 2dc in next ch2 sp.) *Dc in each of the next 2 dc. Rep bet () once. Rep from * around. Join w/slst to top of ch3. Fasten off and weave ends into back of work.
NOTE: Why I chose the colors I chose. I wanted this square to represent the forests of Maine. If you have ever visited the Mountains of Maine, you will know what I am talking about! The forests in Maine are lush and beautiful and you get a great sense of peace when you hike through them! So for this square, I used the colors that to me represent the colors I see in the forests of Maine. The center of the square represents the forest floor, the brown area represents the trunks of the trees and the dark green area is the canopy looking up from the forest floor and the camouflage outer edge is the color of the trees looking down at the forest from above.
Design written on Wednesday, February 19, 2014. Copyright ©2014 By Julie A. Bolduc f121003
All items in our online shop ship free within the US only. I currently offer U.S. shipping only and it is from rural Maine. Delivery can vary from 2–14 days depending on your distance from Maine. Expedited shipping is not available.
Please note: I am now selling all of my paper bead making tools and other items from this web site using Paypal payments.
I have removed all of my paper bead making tools from Amazon. My Kindle crochet pattern books and paper template paperback books continue to be available on Amazon, as they are printed and fulfilled directly by Amazon. If you would like to shop my Etsy Store, follow the link in the header above.
Random Quick Tip!
Bread Tab Marker LabelsIf you use bread tabs to mark your crochet or knit work, you can use a small label on it to mark your place. Then if you need to reuse it, you can just put another label over it.