
Wavy Pillowghan Square
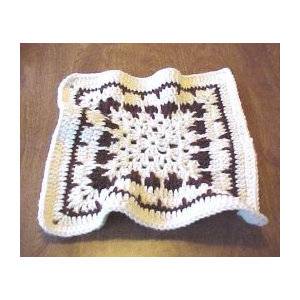
Designed by Julie A Bolduc
This square is a bit different from the normal pillowghan square. It is wavy. If you want it to lie flat, you could use a larger hook. I made it this way just to be different. If you use a soft type of worsted weight yarn, this would produce a very luxurious afghan!
Materials Needed
Worsted Weight acrylic yarn in 2 contrasting colors. I used Red Heart Cream (mc) and Brown (cc).
Size H/6 or 5.00mm aluminum crochet hook or larger.
Yarn Needle
Gauge: 4sc=1"
Yarn Thickness 4mm
Finished Size: 12"x12"
Skill Level: Intermediate
Instructions
RND 1: With MC. Ch4, join w/slst to first ch to form ring. Slst into ring. Ch3, 2dc in ring. Ch 2. *3dc, in ring. Ch2. Rep from * 2 times more. Join w/slst to top of ch3.
RND 2: Ch4, Sk next dc. Dc in next dc. Dc, ch1, dc, ch2, dc, ch1, dc in next ch2 sp. *Dc in next dc. Ch1. Sk next dc. Dc in next dc. Dc, ch1, dc, ch2, dc, ch1, dc in next ch2 sp. Rep from * around. Join w/slst to 3rd ch of ch4.
RND 3: Slst into the first ch1 sp. Ch3, 2dc in same sp. Ch1. 2dc in next ch1 sp. Dc, ch1, dc, ch2, dc, ch1, dc in next ch2 sp. 2dc in next ch1 sp. Ch1. *3dc in next ch1 sp. Ch1. 2dc in next ch1 sp. Dc, ch1, dc, ch2, dc, ch1, dc in next ch2 sp. 2dc in next ch1 sp. Ch1. Rep from * around. Join w/slst to top of ch3.
RND 4: Ch4. Sk next dc. Dc in next dc. 2dc in next ch1 sp. (Ch1. 2dc in next ch1 sp. Dc, ch1, dc, ch2, dc, ch1, dc in next ch2 sp. 2dc in next ch1 sp. Ch1. 2dc in next ch1 sp.) *Dc, in next dc. Ch1. Sk next dc. Dc in next dc. Rep bet () once. Rep from * around. Join w/slst to 3rd ch of ch4. Fasten off mc.
NOTE: You will be working treble crochets in skipped stitches of previous rounds. Work a tr in the skipped stitch of prev rnd over the ch1 sp. Not behind or in front of it but over it. Do this whenever you see this symbol. (tr in sk-st).
RND 5: Join cc in same st as slst. Ch3. *Tr in sk-st. Dc in next dc. Ch1. Sk next dc. Dc in next dc. Tr in each of the next 2 sk-sts. Dc, in next dc. Ch1. 2dc in next ch1 sp. Dc, ch1, dc, ch2, dc, ch1, dc in next ch2 corner sp. 2dc in next ch1 sp. Ch1. Sk next dc. Dc in next dc. Tr in each of the next 2 sk-sts. Dc in next dc. Ch1. Sk next dc. Rep from * around. Join w/slst to top of ch3. Fasten off cc.
RND 6: Join mc in same st as slst. Ch3. Dc in each of the next 2 dc. (Tr in next sk-st. Dc in each of the next 4 dc. Tr in next sk-st. Dc in each of the next 2 dc. 2 dc in next ch1 sp. Dc, ch1, dc, ch2, dc, ch1, dc in next ch2 corner sp. 2dc in next ch1 sp. Sk next dc. Dc in each of the next 2 dc. Tr in next sk-st. Dc in each of the next 4 dc. Tr in next sk-st.) *Dc in each of the next 3 dc. Rep bet () once. Rep from * around. Join w/slst to top of ch3.
RND 7: Ch3. Dc in each of the next 2 dc. Sk next tr. (Dc in each of the next 4 dc. Sk next tr. Dc in each of the next 4 dc. Ch1. 2dc in next ch1 sp. Dc, ch1, dc, ch2, dc, ch1, dc in next ch2 corner sp. 2dc in next ch1 sp. Ch1. Sk next dc. Dc in each of the next 4 dc. Ch1. Sk next tr. Dc in each of the next 4 dc. Ch1. Sk next tr.) *Dc in each of the next 3 dc. Rep bet () once. Rep from * around. Join w/slst to top of ch3. Fasten off mc.
NOTE: This next row is made with sc and dc instead of dc and tr. Work the dc in the skipped stitches the same way as you have been working the tr.
RND 8: Join cc in same st as slst. Ch1. Sc in each of the next 2 dc. (Dc in sk-st. Sc in each of the next 4 dc. Dc in sk-st. Sc in each of the next 4 dc. Dc in sk-st. Sc in each of the next 3 dc. Sc in next ch1 sp. Sc in next dc. Sc, ch2, sc in next ch2 sp. Sc in next dc. Sc in next ch1 sp. Sc in each of the next 3 dc. Dc in sk-st. Sc in each of the next 4 dc. Dc in sk-st. Sc in each of the next 4 dc. Dc in sk-st.) * Sc in each of the next 3 dc. Rep bet () once. Rep from * around. Join w/slst to ch1. Fasten off cc.
RND 9: Join mc in same st as slst. Ch3. Dc in each sc across to first corner. *2dc, ch2, 2dc in next ch2 corner sp. Dc in each sc across to next corner. Rep from * around but when you turn the last corner, just dc in each sc across to where you started then join w/slst to top of ch3.
RND 10: Ch3. Dc in each dc across to first corner. *2dc, ch2, 2dc in next ch2 corner sp. Dc in each dc across to next corner. Rep from * around but when you turn the last corner, just dc in each dc across to where you started then join w/slst to top of ch3. Fasten off and weave all ends into back of work.
DoneDesign written on Monday, September 13, 1999. Copyright ©1999 by Julie A. Bolduc all rights reserved. p121002
All items in our online shop ship free within the US only. I currently offer U.S. shipping only and it is from rural Maine. Delivery can vary from 2–14 days depending on your distance from Maine. Expedited shipping is not available.
Please note: I am now selling all of my paper bead making tools and other items from this web site using Paypal payments.
I have removed all of my paper bead making tools from Amazon. My Kindle crochet pattern books and paper template paperback books continue to be available on Amazon, as they are printed and fulfilled directly by Amazon. If you would like to shop my Etsy Store, follow the link in the header above.
Random Quick Tip!
Crochet Wreaths & SuchSave all of your ring shaped trash like the core of a transparent tape roll. You can use these items as wreath or napkin ring bases to crochet on. I have designed two patterns using these empty tape rolls. One is a wreath and the pattern is available for free at . The other one is a napkin ring pattern and it's available at .