
Stacked Clusters Seat Cushion
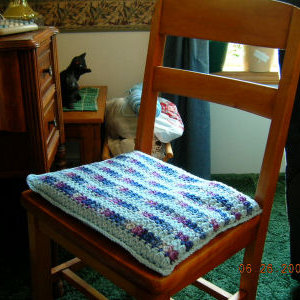
Designed by Julie A Bolduc
This crocheted seat cover is easy to make but it does take some time. I actually use this on the chair that I sit on when I am working on my web site.
Materials Needed
6 oz worsted weight acrylic yarn in 2 colors.
Size H/8 or 5mm aluminum crochet hook
Yarn needle for weaving in ends
2 pieces cotton/polyester fabric in white size 16" x 13"
1 piece of white felt, 16" x 13"
3 pieces of polyester batting, 16" x 13"
Several Quilting pins
White Sewing thread and needle or sewing machine.
Yarn Thickness: 4mm
Gauge: 4dc=1"
Finished Size: 12" x 15"
Skill Level: Intermediate
Instructions
Special Stitch Used: Cl (cluster): *yo, insert hook in stitch indicated draw up a loop, yo draw through 2 lps on hook then rep from * two more times, then yo and draw yarn through all 4 lps on hook.
ROW 1: With blue, ch60. Sc in 2nd ch from hook. *Ch1. Sk next ch. Sc in next ch. Rep from * across. Ch3, turn.
ROW 2: *Cl in next ch1 sp. Ch1. Rep from * across. End with a dc in the last sc. Drop blue but do not fasten off. Join multi, ch1, turn.
ROW 3: Sc in top of first dc. Ch1. *Sc in next ch1 sp. Ch1. Rep from * across. End with a sc in top of ch3. Ch3, turn.
ROW 4: *Cl in next ch1 sp. Ch1. Rep from * across. End with a dc in the last sc. Drop multi but do not fasten off. Join blue, ch1, turn.
ROW 5: Sc in top of first dc. Ch1. *Sc in next ch1 sp. Ch1. Rep from * across. End with a sc in top of ch3. Ch3, turn.
ROW 6-60: Repeat Rows 2-5 14 times.
ROW 61: Repeat Row 2.
ROW 62: Repeat Row 3. Fasten off and weave all ends into back of work.
Assembly
Step 1: Layer the 2 pieces of fabric (wrong sides facing each other), 3 layers of batting and felt in that order on your working surface.
Step 2: With your quilting pins, pin all layers together so all edges are lined up evenly and so they will not shif when you are basting them together.
Step 3: With either your sewing machine or needle and thread, work a back stitch on 3 sides starting on a short side. Use a .25" seam allowance. Leave an opening on the 4th side to turn the insert inside out. Trim material close to stitching and clip corners close to stitching. Turn it inside out after stitching and stitch it closed. Set aside cushion insert.
Step 4: Pick up crochet work. Fold in half so Row One and Row 62 are lined up even, make sure the back sides are facing each other.
Step 5: Lay it down in front of you so the long side is away from you.
Step 6: Pick up work and join blue yarn to bottom right corner and work 2 sc in each dc row up the first side through both layers, work one sc in each sc and each ch1 sp across first and last row, working through both layers.
Step 7: Slip cushion in and finish stitching this last side closed as you did the first side. Fasten off and weave all ends into back of work.
Design written on Tuesday, June 26, 2007. Copyright ©2007 By Julie A. Bolduc
All items in our online shop ship free within the US only. I currently offer U.S. shipping only and it is from rural Maine. Delivery can vary from 2–14 days depending on your distance from Maine. Expedited shipping is not available.
Please note: I am now selling all of my paper bead making tools and other items from this web site using Paypal payments.
I have removed all of my paper bead making tools from Amazon. My Kindle crochet pattern books and paper template paperback books continue to be available on Amazon, as they are printed and fulfilled directly by Amazon. If you would like to shop my Etsy Store, follow the link in the header above.
Random Quick Tip!
Glue Basting Quilt As You Go BlocksHere is another way to baste a quilt block when making your quilt sandwiches. I have done this and it works very well! Instead of using spray or fusible batting, you can put dots of liquid Elmer's School glue where you would normally put your safety pins. I would actually put the dots closer together. Think of this, when we use spray basting or fusible batting, there is glue, why not just use the least expensive option. Little dots of Elmer's school glue. You cannot feel the dots when you are quilting and they do not interfere with the needle in the machine. Just use little dots. The action of pressing the glued layers together flattens the glue dots and as long as they are tiny, you will not feel them. Also, the Elmer's school glue will wash out of clothing even after it is set with an iron. Plus you don't have to worry about overspray or breathing in the glue into your lungs. I have also made a glue/water mixture and brushed it on with a sponge brush. That works well also.