
Rippled Rainbow Easter Egg Pillow
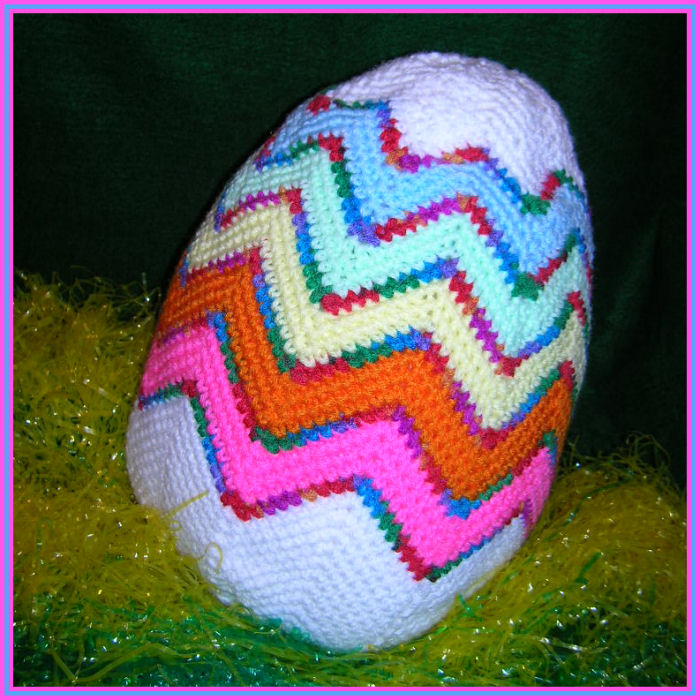
Designed by Julie A Bolduc
This Easter Egg pillow is fun and fairly easy to make for people who have worked with ripple stitches before. It starts from the bottom up and is worked in the round. If you want the colors to look more balanced, you can start making your color changes at around round 16 and add the color lavender at the end of your color changes for a true rainbow of colors.
Materials Needed
Worsted weight acrylic yarn in White
Worsted weight acrylic yarn in a multi color.
Worsted weight acrylic yarn in each of the following 5 colors, bright pink, orange, pale yellow, light green, light blue.*
12 oz extra fluffy polyester fiberfill
Size H/8 or 6mm aluminum crochet hook
Yarn needle for weaving in ends
Yarn Thickness: 4mm
Gauge: 4sc = 1"
Finished Size: 10" x 15"
Skill Level: Intermediate
Instructions
Weave in ends as you go.
RND 1: With White. Ch2, 7sc in 2nd ch from hook. Join w/slst to first sc. (7sc)
RND 2: Ch1. 2sc in same st as slst and in each sc around. Join w/slst to first sc. (14sc)
RND 3: Ch1. 2sc in same st as slst. Sc in next st. *2sc in next st. Sc in next st. Rep from * around. Join w/slst to first sc. (21sc)
RND 4: Ch1. 2sc in same st as slst. Sc in each of the next 2 sc. *2sc in next sc. Sc in each of the next 2 sc. Rep from * around. Join w/slst to first sc.
RND 5: Ch1. 2sc in same st as slst. Sc in each of the next 3 sc. *2sc in next sc. Sc in each of the next 3 sc. Rep from * around. Join w/slst to first sc.
RND 6: Ch1. 2sc in same st as slst. 3sc in next sc. 2sc in next sc. Sk 2 sc. *2sc in next sc. 3sc in next sc. 2sc in next sc. Sk 2 sc. Rep from * around. Join w/slst to first sc.
RND 7: Ch1. *Sc in next sc. 2sc in next sc. 3sc in next sc. 2sc in next sc. Sc in next sc. Sk 2 sc. Rep from * around. Join w/slst to first sc.
RND 8: Ch1. *Sc in each of the next 2 sc. 2sc in next sc. 3sc in next sc. 2sc in next sc. Sc in each of the next 2 sc. Sk 2 sc. Rep from * around. Join w/slst to first sc.
RND 9: Ch1. *Sc in each of the next 3 sc. 2sc in next sc. 3sc in next sc. 2sc in next sc. Sc in each of the next 3 sc. Sk 2 sc. Rep from * around. Join w/slst to first sc.
RND 10: Ch1. *Sc in each of the next 4 sc. 2sc in next sc. 3sc in next sc. 2sc in next sc. Sc in each of the next 4 sc. Sk 2 sc. Rep from * around. Join w/slst to first sc.
RND 11: Ch1. *Sc in each of the next 5 sc. 2sc in next sc. 3sc in next sc. 2sc in next sc. Sc in each of the next 5 sc. Sk 2 sc. Rep from * around. Join w/slst to first sc.
RND 12: Ch1. *Sc in each of the next 6 sc. 2sc in next sc. 3sc in next sc. 2sc in next sc. Sc in each of the next 6 sc. Sk 2 sc. Rep from * around. Join w/slst to first sc. The increases end here.
RND 13: Ch1. *Sc in each of the next 8 sc. 3sc in next sc. Sc in each of the next 8 sc. Sk 2 sc. Rep from * around. Join w/slst to first sc.
RND 14& 15: Rep RND 13.
NOTE: If you are using all 6 rainbow colors instead of just 5, start your color changes here. Fasten off white and join multicolor in same st as slst. To make this egg exactly as I did, continue on in white until you reach round 20.
RND 16-20: Rep RND 13.
RND 21: Join multi to same st as slst. Ch1. *Sc in each of the next 8 sc. 3sc in next sc. Sc in each of the next 8 sc. Sk 2 sc. Rep from * around. Join w/slst to first sc. Fasten off multi color.
RND 22:Join bright pink in same st as slst.Ch1. *Sc in each of the next 8 sc. 3sc in next sc. Sc in each of the next 8 sc. Sk 2 sc. Rep from * around. Join w/slst to first sc.
RND 23 & 24:Rep RND 13. At the end of RND 24, fasten off bright pink.
RND 25: Join multi to same st as slst. Ch1. *Sc in each of the next 8 sc. 3sc in next sc. Sc in each of the next 8 sc. Sk 2 sc. Rep from * around. Join w/slst to first sc. Fasten off multi color.
RND 26: Join orange in same st as slst.Ch1. *Sc in each of the next 8 sc. 3sc in next sc. Sc in each of the next 8 sc. Sk 2 sc. Rep from * around. Join w/slst to first sc.
RND 27 & 28:Rep RND 13. At the end of RND 28, fasten off orange.
RND 29:Join multi to same st as slst. Ch1. *Sc in each of the next 8 sc. 3sc in next sc. Sc in each of the next 8 sc. Sk 2 sc. Rep from * around. Join w/slst to first sc. Fasten off multi color.
RND 30:Join yellow in same st as slst.Ch1. *Sc in each of the next 8 sc. 3sc in next sc. Sc in each of the next 8 sc. Sk 2 sc. Rep from * around. Join w/slst to first sc.
RND 31 & 32:Rep RND 13. At the end of RND 32 fasten off yellow.
RND 33:Join multi to same st as slst. Ch1. *Sc in each of the next 8 sc. 3sc in next sc. Sc in each of the next 8 sc. Sk 2 sc. Rep from * around. Join w/slst to first sc. Fasten off multi color.
RND 34:Join light green in same st as slst.Ch1. *Sc in each of the next 8 sc. 3sc in next sc. Sc in each of the next 8 sc. Sk 2 sc. Rep from * around. Join w/slst to first sc.
RND 35:Rep RND 13
This is where the decreases start to make the narrow end of the egg.
RND 36: Ch1. *Sc in next sc. Sk next sc. Sc in each of the next 6 sc. 3sc in next sc. Sc in each of the next 6 sc. Sk next sc. Sc in next sc. Sk 2 sc. Rep from * around. Join w/slst to first sc. Fasten off light green.
RND 37: Join multi to same st as slst. Ch1. *Sc in each of the next 7 sc. 3sc in next sc. Sc in each of the next 7 sc. Sk 2 sc. Rep from * around. Join w/slst to first sc. Fasten off multi color.
RND 38: Join light blue to same st as slst. Ch1. *Sc in next sc. Sk 1 sc. Sc in each of the next 5 sc. 3sc in next sc. Sc in each of the next 5 sc. Sk 1 sc. Sc in next sc. Sk 2 sc. Rep from * around. Join w/slst to first sc.
RND 39: Ch1. Sc in each of the next 6 sc. 3sc in next sc. Sc in each of the next 6 sc. Sk 2 sc. Rep from * around. Join w/slst to first sc.
RND 40: Ch1. *Sc in next sc. Sk 1 sc. Sc in each of the next 4 sc. 3sc in next sc. Sc in each of the next 4 sc. Sk 1 sc. Sc in next sc. Sk 2 sc. Rep from * around. Join w/slst to first sc. Fasten off light blue.
RND 41: Join multi color to the same st as slst. Ch1. *Sc in each of the next 5 sc. 3sc in next sc. Sc in each of the next 5 sc. Sk 2 sc. Rep from * around. Join w/slst to first sc. Fasten off multicolor.
RND 42: Join white to same st as slst. Ch1. *Sc in next sc. Sk next sc. Sc in each of the next 3 sc. 3sc in next sc. Sc in each of the next 3 sc. Sk next sc. Sc in next sc. Sk 2 sc. Rep from * around. Join w/slst to first sc.
RND 43: Ch1. *Sc in each of the next 4 sc. 3sc in next sc. Sc in each of the next 4 sc. Sk 2 sc. Rep from * around. Join w/slst to first sc.
RND 44:Ch1. *Sc in next sc. Sk next sc. Sc in each of the next 2 sc. 3sc in next sc. Sc in each of the next 2 sc. Sk next sc. Sc in next sc. Sk 2 sc. Rep from * around. Join w/slst to first sc.
RND 45:Ch1. *Sc in each of the next 3 sc. 3sc in next sc. Sc in each of the next 3 sc. Sk 2 sc. Rep from * around. Join w/slst to first sc.
RND 46: Ch1. *Sc in next sc. Sk 1 sc. Sc in next sc. 3sc in next sc. Sc in next sc. Sk next sc. Sc in next sc. Sk 2 sc. Rep from * around. Join w/slst to first sc.
RND 47: Ch1. *Sc in each of the next 2 sc. 3sc in next sc. Sc in each of the next 2 sc. Sk 2 sc. Rep from * around. Join w/slst to first sc. Stuff Egg.
RND 48: Ch1. *Sc in next sc. Sk next sc. 3sc in next sc. Sk next sc. Sc in next sc. Sk 2sc. Rep from * around. Join w/slst to first sc.
RND 49: Ch1. *Sc in each of the next 3 sc. Sk 2 sc. Rep from * around. Join w/slst to first sc.
RND 50: Ch1. *Sc in next sc. Sk 2 sc. Rep from * around. Join w/slst to first sc. (7sc). Fasten off leaving a long end. Weave end through last round and gather up to tighten to close. Weave rest of end into work and trim end.
* NOTE: I used Red Heart Super Saver for all 5 colors and the white. I had intended to use lavender as well but miss judged where I was in the pillow by the time I finished with the blue color so I did not include it. I would start at round 16 with the color changes in order to be able to add lavender. Maybe in the future I will make another one with this pattern and include the lavender starting sooner in the rounds. I used Caron Simply Soft in the multi color in the example but you can use any multicolor yarn you want as long as it is 4 ply acrylic. I really wanted to use Candy colors for the multi but did not have any.
Design written on Sunday April 3, 2011. Copyright ©2011 By Julie A. Bolduc p119008
All items in our online shop ship free within the US only. I currently offer U.S. shipping only and it is from rural Maine. Delivery can vary from 2–14 days depending on your distance from Maine. Expedited shipping is not available.
Please note: I am now selling all of my paper bead making tools and other items from this web site using Paypal payments.
I have removed all of my paper bead making tools from Amazon. My Kindle crochet pattern books and paper template paperback books continue to be available on Amazon, as they are printed and fulfilled directly by Amazon. If you would like to shop my Etsy Store, follow the link in the header above.
Random Quick Tip!
Plastic Templatesfor Small Sewing Projects If you have a thermal laminator, you can use it to laminate a template made with cardstock, then cut the template out. You can use this template over and over as many times as you want! I am using one I made to make face masks for people who want them in my town. The face masks I am making are fitted ones with adjustable elastics that goes around the ears.