
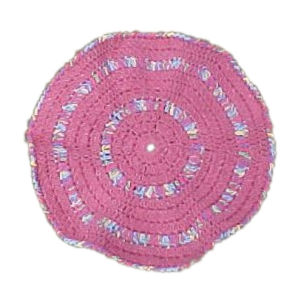
Clusters Pizza Pad
Designed By Julie A. BolducThis pizza pad is just the right size for a 12" hot pizza pan. It can be made in an evening or two and would make a great addition to your kitchen. Especially if you serve a lot of pizza in your house. I have another one that I use every time I make pizza.
Materials Needed
Aunt Lydia's Quick Denim in rose and varigated. Any worsted weight cotton yarn will work. In 2 colors
Size H/8 5mm aluminum crochet hook
Yarn needle
Yarn Thickness: 3mm
Gauge: 4dc=1"
Finished Size: 12½" diam
Skill Level: Beginner
Special Stitches Used:
Cluster (cl): Yo insert hook in st indicated, pull up a lp, yo draw yarn through two lps on hook. Rep from beg a total of 3 times. Yo and draw yarn through all 4 lps on hook.
Instructions
RND 1: With color1. Ch6. Join w/slst to to first ch to form ring. Ch3. Dc in ring. Cl in ring. *2dc in ring. Cl in ring. Rep from * 4 times more. Join w/slst to top of ch3.
RND 2: Ch3. Dc in next dc. 2cl in next cl. *Dc in each of the next 2 dc. 2cl in next cl. Rep from * around. Join w/slst to top of ch3.
RND 3: Ch3. Dc in same st as slst. 2dc in next dc. Cl in each of the next 2 cl. *2dc in each of the next 2 dc. Cl in each of the next 2 cl. Join w/slst to top of ch3. Fasten off color1.
RND 4: Join color 2 to same st as slst. Ch3. Dc in each of the next 3 dc. 2cl in each of the next 2 cl. *Dc in each of the next 4 dc. 2cl in each of the next 2 cl. Rep from * around. Join w/slst to top of ch3. Fasten off color2.
RND 5: Join color1 to same st as slst. Ch3. Dc in same st as slst. Dc in each of the next 2 dc. 2dc in next dc. Cl in each of the next 4cl. *2dc in next dc. Dc in each of the next 2 dc. 2dc in next dc. Cl in each of the next 4 cl. Rep from * around. Join w/slst to top of ch3.
RND 6: Ch3. Dc in each of the next 5 dc. 2cl in each of the next 4 cl. *Dc in each of the next 6 dc. 2cl in each of the next 4 cl. Rep from * around. Join w/slst to top of ch3.
RND 7: Ch3, dc in same st as slst. Dc in each of the next 4 dc. 2dc in next dc. Cl in each of the next 8 cl. *2dc in next dc. Dc in each of the next 4 dc. 2dc in next dc. Cl in each of the next 8 cl. Rep from * around. Join w/slst to top of ch3. Fasten off color1.
RND 6: Join color 2 to same st as slst. Ch3. Dc in each of the next 7 dc. 2cl in next cl. Cl in each of the next 6 cl. 2cl in next cl. *Dc in each of the next 8 dc. 2cl in next cl. Cl in each of the next 6 cl. 2cl in next cl. Rep from * around. Join w/slst to top of ch3. Fasten off color 2.
RND 7: Join color1 to same st as slst. Ch3. Dc in same st as slst. Dc in each of the next 6 dc. 2dc in next dc. Cl in each of the next 10 cl. *2dc in next dc. Dc in each of the next 6 dc. 2dc in next dc. Cl in each of the next 10 cl. Rep from * around. Join w/slst to top of ch3.
RND 8: Ch3. Dc in each of the next 9 dc. 2cl in next cl. Cl in each of the next 8cl. 2cl in next cl. *Dc in each of the next 10 dc. 2cl in next cl. Cl in each of the next 8 cl. 2cl in next cl. Rep from * around. Join w/slst to top of ch3. Fasten off color 1.
RND 9: Join color 2 in any st. Work 1 reverse sc in each st around. Join w/slst to first reverse sc.
Design written on Sunday, August 12, 2001. Copyright ©2001 By Julie A. Bolduc f102002
All items in our online shop ship free within the US only. I currently offer U.S. shipping only and it is from rural Maine. Delivery can vary from 2–14 days depending on your distance from Maine. Expedited shipping is not available.
Please note: I am now selling all of my paper bead making tools and other items from this web site using Paypal payments.
I have removed all of my paper bead making tools from Amazon. My Kindle crochet pattern books and paper template paperback books continue to be available on Amazon, as they are printed and fulfilled directly by Amazon. If you would like to shop my Etsy Store, follow the link in the header above.
Random Quick Tip!
Crocheted Gift TiesCrochet chains make wonderful package ties!