
Side Stitching Pot Holder
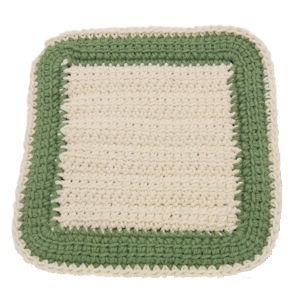 Designed By Julie A. Bolduc
This pot holder is made in 2 parts that are crocheted together back to back. It is very thick and oversized, perfect for working with or lifting large pots and pans.
Materials Needed
Worsted weight cotton yarn in ecru and sage green
Size G/6 or 4mm aluminum crochet hook
Yarn Needle for weaving in ends
Yarn Thickness: 3mm
Gauge: 4sc=1"
Finished Size: 7½" x 7¾"
Skill Level: Intermediate
Instructions
Work in rows first, then in rounds. Make 2 same.
ROW 1: With Ecru, ch24. Pull up a loop in each of the first 3 chs from hook, you should have 4 lps on hook, yo, pull through 2 loops on hook 3 times. (Pull up a loop in each of the next 2 side bars and in next ch, yo, pull through 2lps on hook 3 times.) Rep bet () across. Ch1, turn
ROW 2: Sc in each st across. Ch3, turn.
ROW 3: Pull up a loop in each of the next 2 chs from hook and in next sc. Yo, pull through 2lps on hook 3 times. *Pull up a loop through each of the 2 side bars and in next sc. Yo, pull through 2lps on hook 3 times. Rep from* across. Ch1, turn.
ROW 4-11: Rep ROWs 2 & 3 consecutively. At the end of ROW 11, fasten off and weave ends into back of work.
Perimeter
You will be working the first round around the perimeter.
RND 1: Join green in last corner stitch just made on the top side of the stitch. Ch2, sc around corner but in same stitch to turn corner. Work 20 sc evenly spaced across each side and a sc, ch1, sc in each corner stitch around. When you get back to where you started, join w/slst to first ch of ch2.
RND 2: Slst into the first ch1 sp. Ch3, pull up a loop in each of the next 2 chs from hook and in ch1 sp. Yo, pull up a loop through 2 loops on hook 3 times. [Pull up a loop through each of the next 2 side bars and in same ch1 sp, yo, pull up a loop through 2loops on hook 3 times.] Repeat bet [] a total of 3 times more to have 5 repeats in total in the same chain 1 space. (Pull up a loop through each of the 2 side bars and in next sc. Yo, pull through 2lps on hook 3 times.) Repeat bet () 21 times more on this first side. Rep bet [] 5 times in the next corner ch1 sp. Rep bet () 22 times on the 2nd side. Rep bet [] 5 times more in next ch1 corner sp. Rep bet () 22 times more across 3rd side. Rep bet [] 5 times more for the 4th ch1 corner sp. Rep bet () 22 times for the 4th side. Join w/slst to top of ch3. Fasten off leaving an end long enough to close little gap bet first and last stitch of round and to weave the rest of the end into the back of work.
Final Assembly
Join front to back, wrong sides facing each other and working through both layers at a time, using the ecru color. Join to any stitch and work 1sc in each st around. Join w/slst to first sc. Fasten off and weave all ends into work.
Design written on Thursday, January 16, 2014. Copyright ©2014 By Julie A. Bolduc p102022
All items in our online shop ship free within the US only. I currently offer U.S. shipping only and it is from rural Maine. Delivery can vary from 2–14 days depending on your distance from Maine. Expedited shipping is not available.
Please note: I am now selling all of my paper bead making tools and other items from this web site using Paypal payments.
I have removed all of my paper bead making tools from Amazon. My Kindle crochet pattern books and paper template paperback books continue to be available on Amazon, as they are printed and fulfilled directly by Amazon. If you would like to shop my Etsy Store, follow the link in the header above.
Random Quick Tip!
Easier Crocheting Dark YarnsTo make it easier to crochet or knit with black or other really dark yarns, lay a white cloth across your lap. You will be able to see the stitches better. You can also use a light above your work which will help to enhance the stitches.