
Ripple Stitch Pincushion
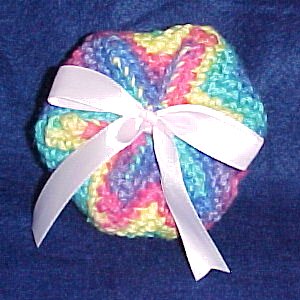
Designed By Julie A. Bolduc
This pincushion uses the ripple stitch which I hardly ever do. I was able to work it up in just a couple of hours so it can be a fast and easy gift to make at the last minute.
Materials Needed
Worsted weight acrylic yarn in any ombre or varigated color
Size H/8 aluminum crochet hook
12" of ½" wide pink satin ribbon
Polyester Fiber fill
Tapestry Needle for weaving in ends
Yarn Thickness: 4mm
Gauge: 4dc = 1"
Finished Size: 4" diam
Skill Level: Intermediate
Instructions
RND 1: Ch66. Being careful not to twist chain, join w/slst to first ch to form ring. Ch1. Sc in each of the next 3 chs. (3sc in next ch. Sc in each of the next 4 chs. Sk 2 chs.) *Sc in each of the next 4 chs. Rep bet () once. Rep from * around. Join w/slst to ch1.
RND 2-9: Ch1. *Sc in each of the next 4 sts. 3sc in next st. Sc in each of the next 4 sts. Sk 2 sts. Rep from * around. Join w/slst to first sc. Fasten off leaving a long enough end to Stitch the opening closed.
Finishing : Using a whip stitch, stitch first round closed by putting the points together toward the center and work 1 whip stitch per crochet stitch. Do the same with last round but stuff tightly with stuffing before closing. Tie a ribbon to the center and tie into a bow to cover the hole that was formed.
Design written on Wednesday, June 23, 2004. Copyright ©2004 By Julie A. Bolduc p106015
All items in our online shop ship free within the US only. I currently offer U.S. shipping only and it is from rural Maine. Delivery can vary from 2–14 days depending on your distance from Maine. Expedited shipping is not available.
Please note: I am now selling all of my paper bead making tools and other items from this web site using Paypal payments.
I have removed all of my paper bead making tools from Amazon. My Kindle crochet pattern books and paper template paperback books continue to be available on Amazon, as they are printed and fulfilled directly by Amazon. If you would like to shop my Etsy Store, follow the link in the header above.
Random Quick Tip!
Keep All Beads From Rolling AwayIf you have a fleece bead cloth, use that to keep your beads from rolling away but if you don't have one, you can use a terry wash cloth, a piece of velour or velvet fabric or some other piece of fabric that has a fuzzy knap to it for the same purpose.