
Fashion Doll Spring Sun Dress
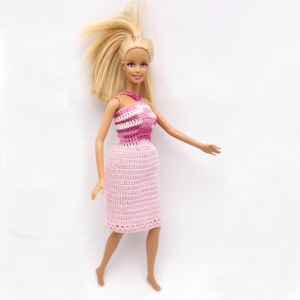 Designed By Julie A. Bolduc
This doll dress starts with the bodice with the shaded pinks, the skirt is made followed by the straps. and the back is closed with hook and loop tape. You can use what ever colors you want!
Materials Needed
Southmaid Crochet Cotton Size 10 in Shaded Pinks
Red Heart Classic Crochet Thread size 10 in Orchid Pink Color: 0401
Hook and loop tape, a piece 1" x ¼"
White sewing thread and a needle
Tapestry Needle for weaving in ends
Yarn Thickness: 10thread
Gauge: 11dc = 1"
Finished Size: Fits an 11.5" fashion doll
Skill Level: Intermediate to Advanced
Special Stitch: Dec Yo, insert hook in next st, pull up a loop and draw through 2 loops on hook twice, yo, pull through all 3 lps on hook.
InstructionsStarting at Bodice
ROW 1: Ch45. Sc in 2nd ch from hook and in each of the next 21 chs. Sk next ch. Sc in each of the next 22 chs. Ch1, turn.
ROW 2: Sc in each of the first 10 sc. 2dc in next sc. Dc in each of the next 5 sc. 2dc in each of the next 4 sc. Sk next sc. Dc in each of the next 4 dc. 2dc in next sc. Dc in each of the next 5 sc. 2dc in next sc. Sc in each of the next 10 sc. Ch1, turn.
ROW 3: Sc in each of the first 10 sc. 2dc in next sc. Dc in each of the next 24 dc. 2dc in next dc. Sc in each of the next 10 sc. Ch1, turn.
ROW 4: Sc in each of the next 10sc. 2dc in next dc. Dc in each of the next 11sts. Dec 2 sts. Dc in each of the next 11 sts. 2dc in next st. Sc in each of the next 10 sts. Ch1, turn.
ROW 5: Sc in each of the next 10 sc. Dc in each of the next 6 dc. 2dc in next dc. Dc in each of the next 14 dc. 2dc in next dc. Dc in each of the next 6dc. Sc in each of the next 10 sc. Ch1, turn.
ROW 6: Sc in each of the next 10 sc. Dc in each of the next 9 dc. Dec1. Dc in each of the next 9 dc. Dec 1. Dc in each of the next 9 dc. Sc in each of the next 10 sc. Ch, 3 turn.
ROW 7: Sk first sc. Dc in each of the next 9 dc. Sk 1 st. Sc in each of the next 26 dc. Sk 1 st. Dc in each of the next 10 sts. Ch3, turn.
ROW 8: Dc in each of the next 18 dc. Dec 4. Dc in each of the next 18 dc and in top of ch3. Ch3, turn.
ROW 9: Dc in each of the next 18 sts. Dec 1. Dc in each of the next 2 sts. Dec 1. Dc in each of the next 17 sts and in top of ch3. Fasten off pinks.
Skirt PartJoin orchid pink to same st as slst.
ROW 10: Dc in each of the next 16dc. Tr in each of the next 6 sts. Dc in each of the next 16dc and in top of ch3.
ROW 11: Dc in each of the next 3dc. 2dc in each of the next 13dc. Tr in each of the next 6dc. 2dc in each of the next 13dc. Dc in each of the next 3dc and in top of ch3.
ROW 12: Ch3. Dc in each of the next 61 sts. Join w/slst to top of ch3 leaving the last 3 dc and the ch3 unworked. This forms the placket on the back of the bodice.
RND 13-25: Ch3. Dc in each dc around. Join w/slst to top of ch3.
RND 26: Sc in same st as slst. Ch3. Sk 1 st. *Sc in next st, ch3, sk next st. Rep from * around. Join w/slst to first sc.
RND 27: Slst into the first ch3 sp. Ch3, dc in same sp. 2dc in each ch3 sp around. Join w/slst to top of ch3. Fasten off and weave ends into back of work.
StrapsJoin pinks to 6th stitch on ROW 1 from right hand side. Ch3, dc in same st as joining. Ch3, dc in previous dc, 4 times. 2Sc in the skipped ch space of ROW 1. Ch3, dc in previous dc, 5 times. Sl st to 6th st from left hand side of ROW 1. Ch1. Fasten off and weave all ends into back of work.
Hook and Loop Tape ClosureUsing the white sewing thread doubled up, use an overhand stitch to stitch the hook and loop tape to the placket on the back for the closure.
Design written on Thursday, March 13, 2014. Copyright ©2014 By Julie A. Bolduc p113023
All items in our online shop ship free within the US only. I currently offer U.S. shipping only and it is from rural Maine. Delivery can vary from 2–14 days depending on your distance from Maine. Expedited shipping is not available.
Please note: I am now selling all of my paper bead making tools and other items from this web site using Paypal payments.
I have removed all of my paper bead making tools from Amazon. My Kindle crochet pattern books and paper template paperback books continue to be available on Amazon, as they are printed and fulfilled directly by Amazon. If you would like to shop my Etsy Store, follow the link in the header above.
Random Quick Tip!
Remember What ThreadWhile keeping track of what your ball of thread is when you open a new ball of thread, put the wrapper inside the ball. That way, if you need to buy more of the same stuff, you will know what it is.