
Luxury Hat
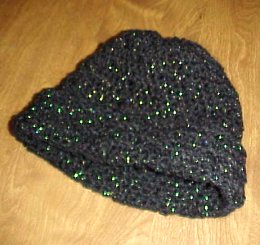
Designed by Julie A Bolduc
This hat is made in a way that when you use a soft yarn, it feels really soft and luxurious. It is an easy hat to make and you can probably make several of these during the upcoming holiday season to give as gifts.
Materials Needed
1 Ball woolese worsted weight yarn. Or an acrylic/Wool blend. Or an soft acrylic yarn. I used a woolese yarn thatn has a strand of silver thread running through it.
Size J/10 aluminum crochet hook
Yarn needle
Yarn Thickness 3mm
Gauge: 7dc=2"
Finished Size: 10"x9" Fits Adult Woman's head
Skill Level: Beginner
Instructions
RND 1: Ch4, join w/slst to first ch to form ring. Slst into ring. Ch3 (counts as 1dc). 2dc in ring. Ch1. *3dc in ring. Ch1. Rep from * 5 times more. So now you should have 7 groups of 3dc in each group. Join w/slst to top of ch3.
RND 2: Ch4, sk next dc. Dc in next dc. 3dc in next ch1 sp. *Dc in next dc. Ch1. Sk next dc. Dc in next dc. 3dc in next ch1 sp. Rep from * around. Join w/slst to 3rd ch of ch4.
RND3: Ch3. *Tr in skipped stitch of previous rnd in front of ch1 sp. Tr in same skipped stitich behind ch1 sp. Tr again in same skipped stitch in front of ch 1 sp. Dc in each of the next 3dc. Ch1. Sk next dc. Dc in each of the next 3 dc. Rep from * around. When you get back to where you started, you will dc in the last two dc then join w/slst to top of ch3.
RND 4: Ch3. Dc in next tr. Sk next tr. Dc in next tr. Dc in each of the next 2 dc. Tr in skipped dc of previous rnd behind ch1 sp. (You will do this when ever you work a tr from here on out). Dc in next 2 dc. *Dc in next tr. Ch1. Sk next tr. Dc in next tr. Dc in each of the next 2 dc. Tr in next skipped dc. Dc in next 2 dc. Rep from * around. Join w/slst to top of ch3.
RND 5: Ch3. Dc in next dc. *Tr in next skipped tr, behind ch1 sp. Dc in next 3 sts. Ch1. sk next st. Dc in each of the next 3 sts. Tr in next skipped stitch behind ch1 sp. Dc in next 3 sts. Rep from * around. You will end with a tr and a dc in the last 2 stitches. Join w/slst to top of ch3.
RND 6: Ch3. Dc in next dc. Sk next tr. Dc in each of the next 3 sts. Tr in next skipped st behind ch1 sp. *Dc in each of the next 3 sts. Ch1. Sk next tr. Dc in each of the next 3 sts. Tr in next skipped stitch behind ch 1 sp. Rep from * around but when you get back to where you started, you will end with a dc in the very last stitch. Join w/slst to top of ch3.
RND 7-21: Rep rnds 5& 6.
RND 22: Sc in each st around but when you come to a ch1 sp. over a skipped stitch, work a dc in the skipped stitch behind the ch1 sp. When you get back to the beginning, join w/slst to first sc. Fasten off and weave ends into back of work.
Design written on Friday, October 15, 1999. Copyright ©1999 By Julie A. Bolduc p124010
All items in our online shop ship free within the US only. I currently offer U.S. shipping only and it is from rural Maine. Delivery can vary from 2–14 days depending on your distance from Maine. Expedited shipping is not available.
Please note: I am now selling all of my paper bead making tools and other items from this web site using Paypal payments.
I have removed all of my paper bead making tools from Amazon. My Kindle crochet pattern books and paper template paperback books continue to be available on Amazon, as they are printed and fulfilled directly by Amazon. If you would like to shop my Etsy Store, follow the link in the header above.
Random Quick Tip!
Fancy Gift BreadsIf you have a bread machine, don't forget to make some great gifts of breads and fancy coffee cakes for your friends. It is so much nicer to let the machine do your mixing for you so you can do other things.