
My Man's Hat
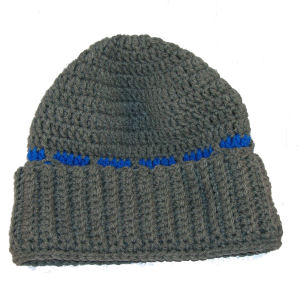
Designed by Julie A Bolduc
My husband needed a new hat for this upcoming winter and so I decided now is as good a time as any to make a new one for him and he likes simple but bulky hats and this is what I came up with. First you make the cuff, then make the crown then stitch the 2 pieces together.
Materials Needed
3oz Worsted weight acrylic yarn. Red Heart Super Savor in Grey Heather was used in the example.
Scrap of worsted weight acrylic yarn in any color. (about 20 yards)
Size H/8 or 6mm aluminum crochet hook
Yarn Needle for weaving in ends
Yarn Thickness: 4mm
Gauge: 4dc =1"
Finished Size: Fits an adult man.
Skill Level: Beginner
Instructions
Cuff:
ROW 1: With grey. Ch 13. Sc in 2nd ch from hook and in each ch across. Ch1, turn.
ROW 2-66: Working in back lps only from here on out, sc in each st across. Ch1, turn.
Slst row1 and row 66 together to form a tube. Ch1. Work 66 sc evenly space around tube on the ends of each row around. Join w/slst to first sc. Fasten off and weave ends into back of work. Set cuff aside to work on crown.RND 1: With grey. Ch4, join w/slst to first ch to form ring. Ch3. 11 dc in ring. Join w/slst to first dc. Not to the top of ch3. (11dc around.)
RND 2: Ch3. Dc in same st as slst. 2dc in each dc around. Join w/slst to top of ch3. (22dc)
RND 3: Ch3. Dc in same st as slst. Dc in next dc. *2dc in next dc. Dc in next dc. Rep from * around. Join w/slst to top of ch3. (33dc )
RND 4: Ch3. Dc in same st as slst. Dc in each of the next 2 dc. *2dc in next dc. Dc in each of the next 2 dc. Rep from * around. Join w/slst to top of ch3. (44dc)
RND 5: Ch3. Dc in same st as slst. Dc in each of the next 3 dc. *2dc in next dc. Dc in each of the next 3 dc. Rep from * around. Join w/slst to top of ch3.(55dc)
RND 6: Ch3. Dc in same st as slst. Dc in each of the next 4 dc. *2dc in next dc. Dc in each of the next 4 dc. Rep from * around. Join w/slst to top of ch3. (66dc)
RND 7-10: Ch3. Dc in each dc around. Join w/slst to top of ch3.
RND 11: Ch8. Sk next 5 dc. *Dc in next dc. Ch5. Sk next 5 dc. Rep from * around. Join w/slst to 3rd ch of ch8. Do not fasten off. Just drop the yarn to the inside and pick up scrap yarn & join to where you are.
RND 12: Ch1. Work 1 dc in each of the next 5 skipped dc of previous round behind ch5 sp. *Sc in next dc. Work 1 dc in each of the next 5 skipped dc of previous round behind ch5 sp. Rep from * around. Join w/slst to ch1. Fasten off scrap yarn and weave ends into back of work.
RND 13-19: Ch3. Dc in each st around. Join w/slst to top of ch3. Fasten off and weave ends into back of work.
Assembly:
Join cuff to crown by working 1 sc through all 4 lps of cuff and round 19 of crown. Join w/slst to first sc. Fasten off and weave ends into back of work.
Design written on Saturday, September 17, 2005. Copyright ©2005 By Julie A. Bolduc p124016
All items in our online shop ship free within the US only. I currently offer U.S. shipping only and it is from rural Maine. Delivery can vary from 2–14 days depending on your distance from Maine. Expedited shipping is not available.
Please note: I am now selling all of my paper bead making tools and other items from this web site using Paypal payments.
I have removed all of my paper bead making tools from Amazon. My Kindle crochet pattern books and paper template paperback books continue to be available on Amazon, as they are printed and fulfilled directly by Amazon. If you would like to shop my Etsy Store, follow the link in the header above.
Random Quick Tip!
Compost Crafting WasteDid you know you can compost some of your crafting waste! Anything that began as a plant, such as cotton fabric, batting, yarn, paper and other natural crafting supplies can be shredded up really small and added to your compost heap as long as you don't have any synthic chemicals on or in it.